Step-by-step instructions for clinic staff and patients. Choose your role, find the task, and follow the numbered steps.
1. Introduction
1.1 Who uses the system
| Role | Who | Main responsibilities |
|---|---|---|
| Admin | Clinic owner or manager | Sets up the clinic, manages doctors and receptionists, and can see and manage all patients and appointments. |
| Doctor | Each consulting doctor | Runs patient visits: medical records, prescriptions, lab tests and printing. Manages their own receptionists. |
| Receptionist | Front-desk staff of one or more doctors, or of the whole clinic | Registers patients, books appointments and records vitals. Does not see diagnoses, medical records or test results. With the doctor's permission it can also see the medicines of a prescription, print the prescription sheet and upload test result files for patients. |
| Patient | Registered patients | Books appointments, views own records and prescriptions, uploads lab results. |
1.2 How to read the steps
| Written as | Meaning |
|---|---|
| Save Visit | A button, link, tab or field label exactly as it appears on screen. |
| Patients → Add Patient | Click Patients in the top menu, then the Add Patient button. |
/Patient/Create |
The page address, for reference. You normally reach pages through the menu. |
1.3 Words used in this guide
| Term | Meaning |
|---|---|
| Regular patient | A patient with their own login. The phone number is the username. |
| Guest patient | A walk-in registered with minimal details. A guest can also sign in with the phone number. Can be converted to a regular patient later. |
| Starting password | The password staff set when they create your account. By default it is your phone number, unless staff typed another one. You can keep it or change it yourself at any time. |
| Vitals | Measurements taken before the visit: blood pressure, pulse, temperature, SpO₂, weight, height, blood sugar. |
| Clinic-wide receptionist | A receptionist created by the Admin who works for all doctors. |
| Shared receptionist | A receptionist the Admin assigned to more than one doctor. They see the patients and appointments of all those doctors. Each doctor sets the receptionist's permissions for their own patients only. |
| Prescription design | The printed layout of the prescription sheet (Classic, Modern or a doctor's own design). |
| Mobile app | The clinic's Android app. It shows the same system with a phone layout. See Mobile app. |
2. Getting Started
2.1 Signing in
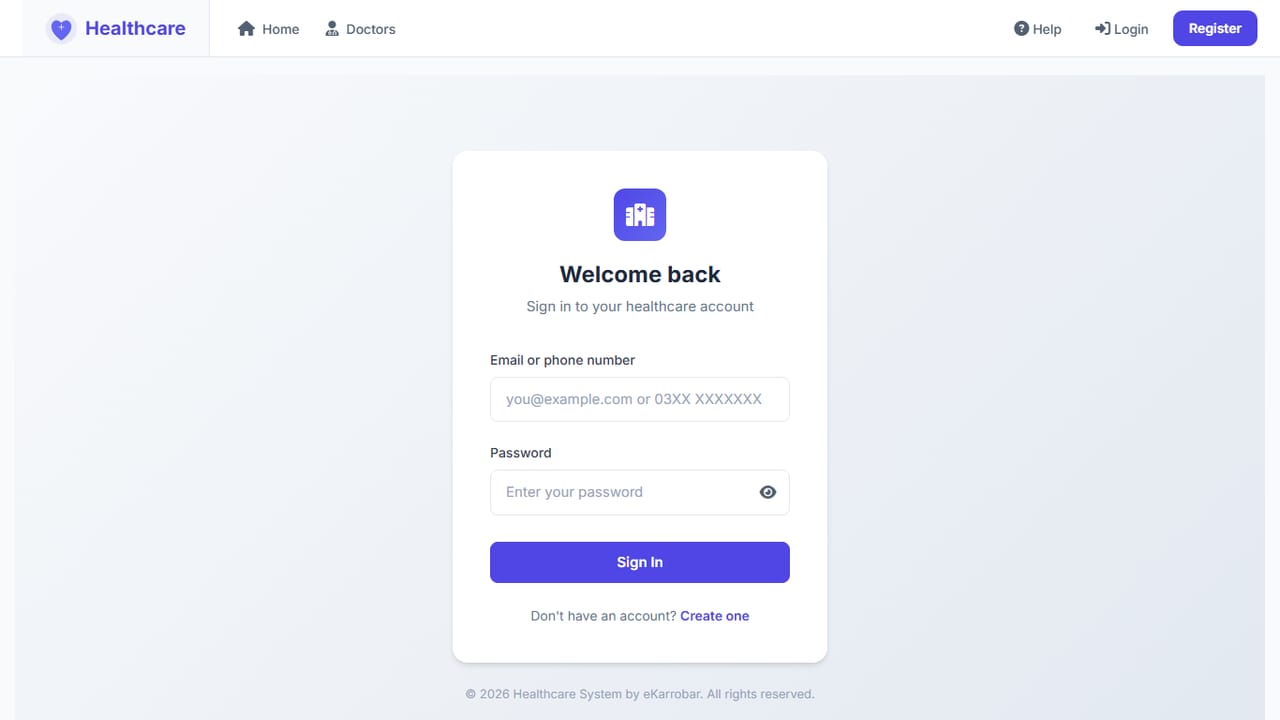
- Open the clinic's web address and click Login.
- In Email or phone number, type your email or the phone number the clinic registered you with. Any format works, for example
0300 1234567or+92 300 1234567. - Type your Password. Click the eye icon at the right of the box to check what you typed.
- Click Sign In. Your own dashboard opens.
No account yet? Patients can click Register and create their own account. Staff accounts are created by the clinic.
After 10 wrong attempts in a row for the same email or phone number, sign-in is paused for 2 minutes to protect the account, even if the next password is right. The page says Too many failed attempts. Try again in 2 minutes. Wait, then try again with the correct password. A correct sign-in starts the count again. If you forgot the password, ask the clinic to set a new one.
You are signed out automatically after 2 hours without activity. If you then send a form, Sign in shows Your session expired. Please sign in again.; after you sign in you return to the page you were on (the text you typed is not kept, so check the form). Opening a page you may not use shows Access Denied with your role, and a link or page that does not exist shows Page not found with buttons to go back or to your dashboard. If something goes wrong on our side you see Something went wrong with a reference number to quote to the clinic. The mobile app keeps you signed in for 30 days, so it does not show the expired message.
2.2 Signing in for the first time with a password from the clinic
When the clinic creates your account (patients, guests and receptionists), your login is your phone number and the password is, by default, the same phone number. If staff typed a different password, they tell you what it is.
- Open the sign-in page (Login in the top menu).
- Type your phone number and the password the clinic gave you (by default your phone number).
- Click Sign In. You go straight to your home page. Nothing else is required.
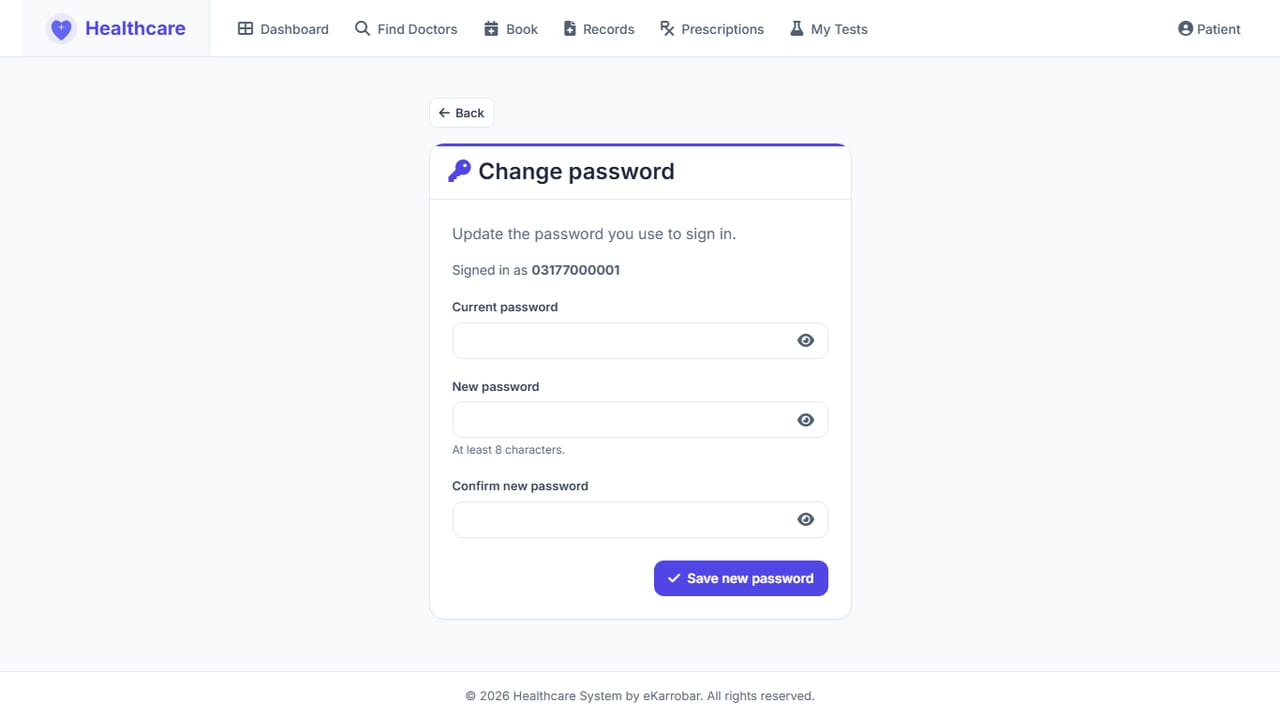
To choose your own password, click your role name at the top right, then Change password (in the app: More → Change password). Enter your current password, then a new password of at least 6 characters twice, and click Save new password.
2.3 The screen layout
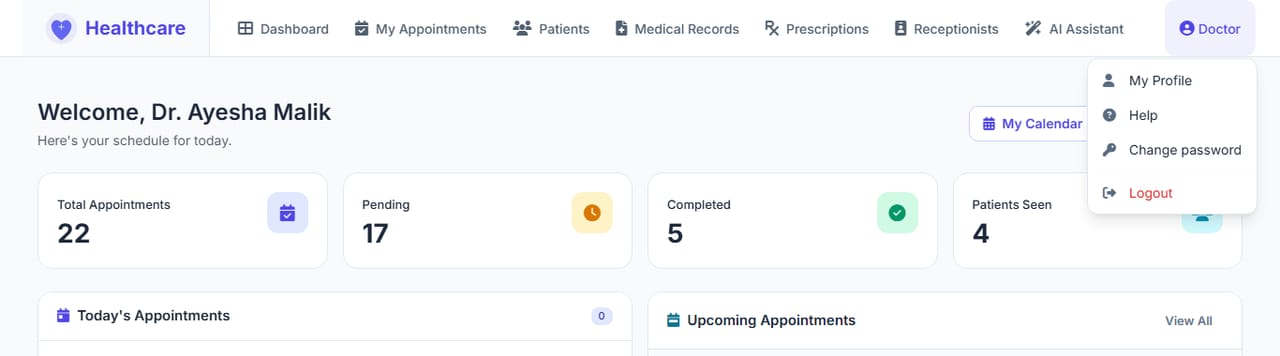
- Top menu: the pages available to your role. The menu is different for each role. On a smaller screen the last items move into More.
- Role name (top right): opens the account menu with My Profile (doctors and patients), Help (this guide, showing the chapters for your role), Change password and Logout.
- Chat button (bottom right, Admin and Doctor): the AI assistant. Receptionists open AI Assistant from the menu (it has no chat button).
- Dates and times are shown in Pakistan time.
On a phone, use the clinic's Mobile app: it has bottom tabs instead of the top menu.
2.4 Setting up a new clinic
A new clinic completes these steps once, in this order:
| Step | Who | Task | Section |
|---|---|---|---|
| 1 | Admin | Change the default Admin password | 2.2 |
| 2 | Admin | Enter the clinic profile and upload the logo | 3.1 |
| 3 | Admin | Add every doctor | 3.2 |
| 4 | Each doctor | Upload signature and choose a prescription design | 4.10, 4.11 |
| 5 | Admin or doctor | Add receptionists and set their permissions | 3.4, 4.12 |
| 6 | Front desk | Start registering patients and booking appointments | 5 |
3. Admin Guide
| This role can | This role cannot |
|---|---|
| Set up the clinic profile; add and edit doctors; add, change, deactivate and remove receptionists; register and edit patients; book, reschedule, cancel and delete appointments; record vitals; view all medical records and prescriptions; read the audit log; use the Admin assistant. | Write medical records or prescriptions (doctors only); design prescriptions. |
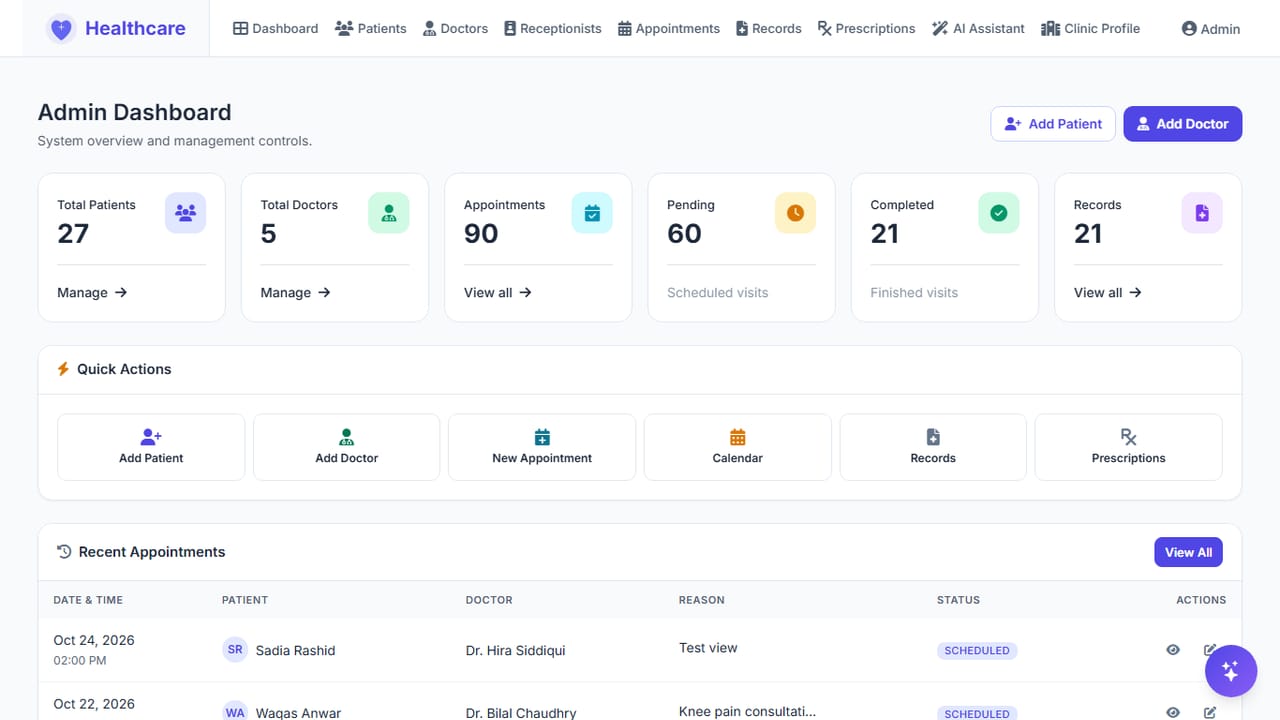
Menu: Dashboard · Patients · Doctors · Receptionists · Appointments · Records · Prescriptions · AI Assistant · Clinic Profile · Audit log
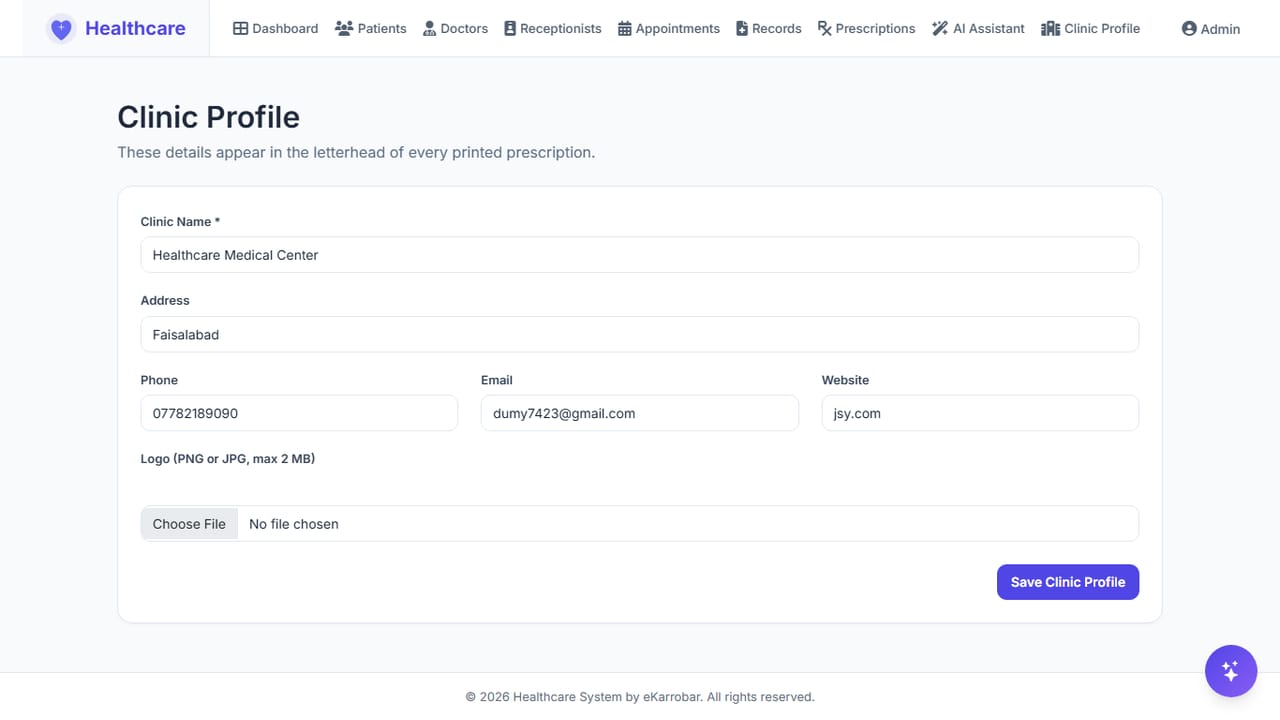
3.1 Set up the clinic profile
The clinic details and logo are printed at the top of every prescription. The website is part of that header too.
- Click Clinic Profile in the menu.
- Enter Clinic Name, Address, Phone, Email and Website.
- Choose the Currency of the clinic (Pakistani Rupee is selected by default; the list has every currency). It is used for every doctor fee in the app (Find Doctors, doctor profiles, appointment details, Book Appointment). Changing it does not convert fee amounts that are already entered.
- Under Logo, choose a PNG or JPG file of up to 2 MB.
- Click Save Clinic Profile.
3.2 Add a doctor
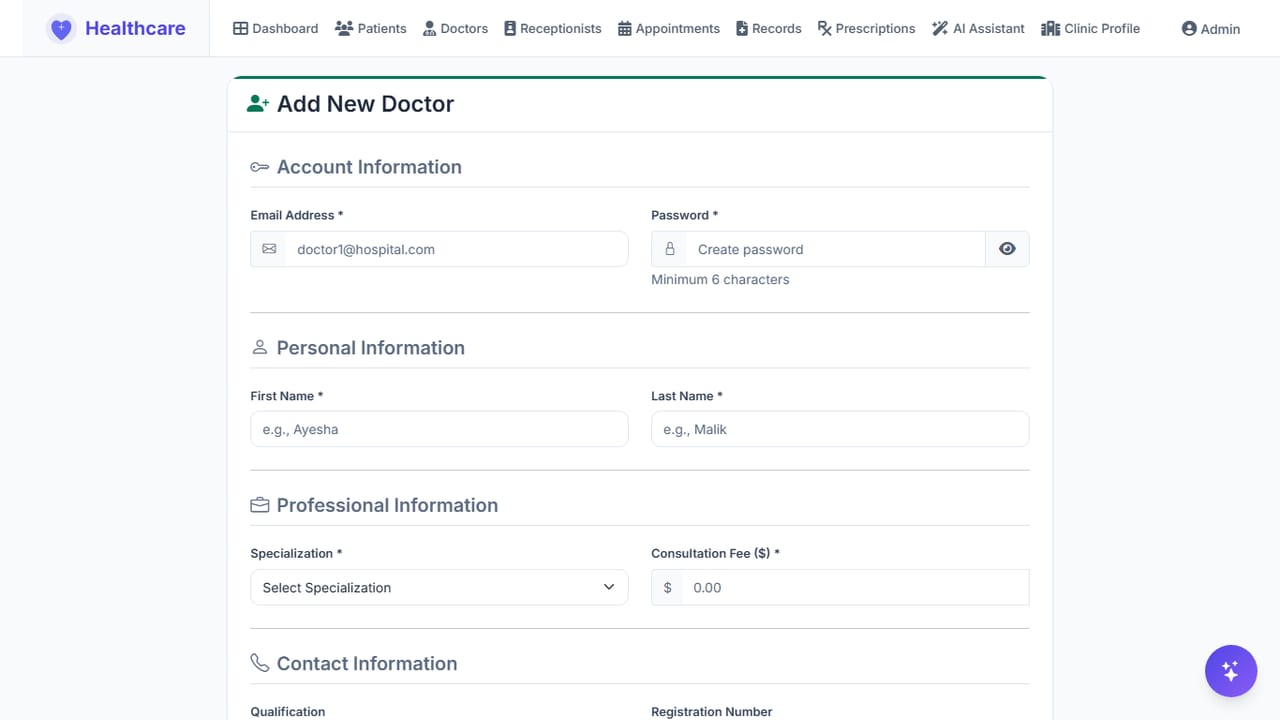
- Click Doctors → Add Doctor.
- Enter the doctor's login Email Address and a Password of at least 6 characters.
- Enter First Name, Last Name, Specialization and Consultation Fee, and if available Qualification, Registration Number, Phone Number and Professional Email.
- Optional: upload the Signature Image (PNG or JPG, up to 2 MB).
- Click Create Doctor.
- Give the doctor their email and the password you set. They can change it later from Change password.
3.3 Edit a doctor
- Click Doctors, then View Profile on the doctor.
- Click Edit Profile & Prescription Design.
- Change the details, the signature or the Prescription Design.
- Click Save Changes.
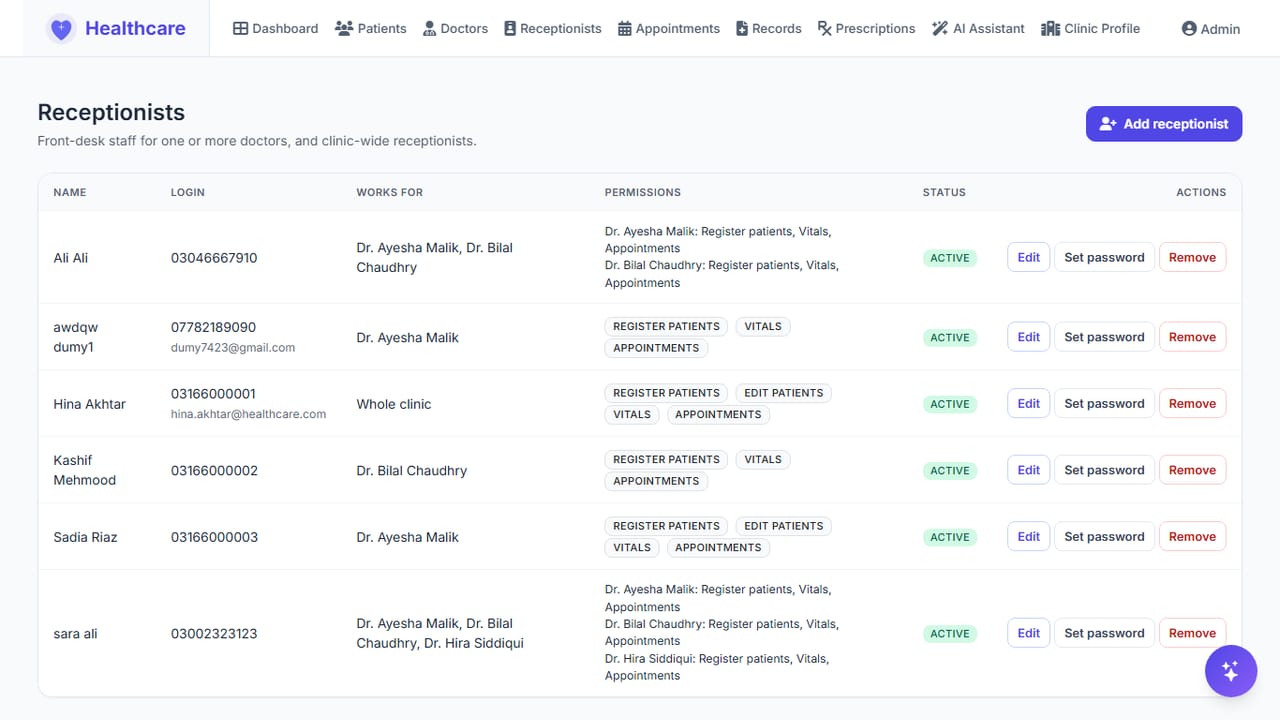
3.4 Add a receptionist
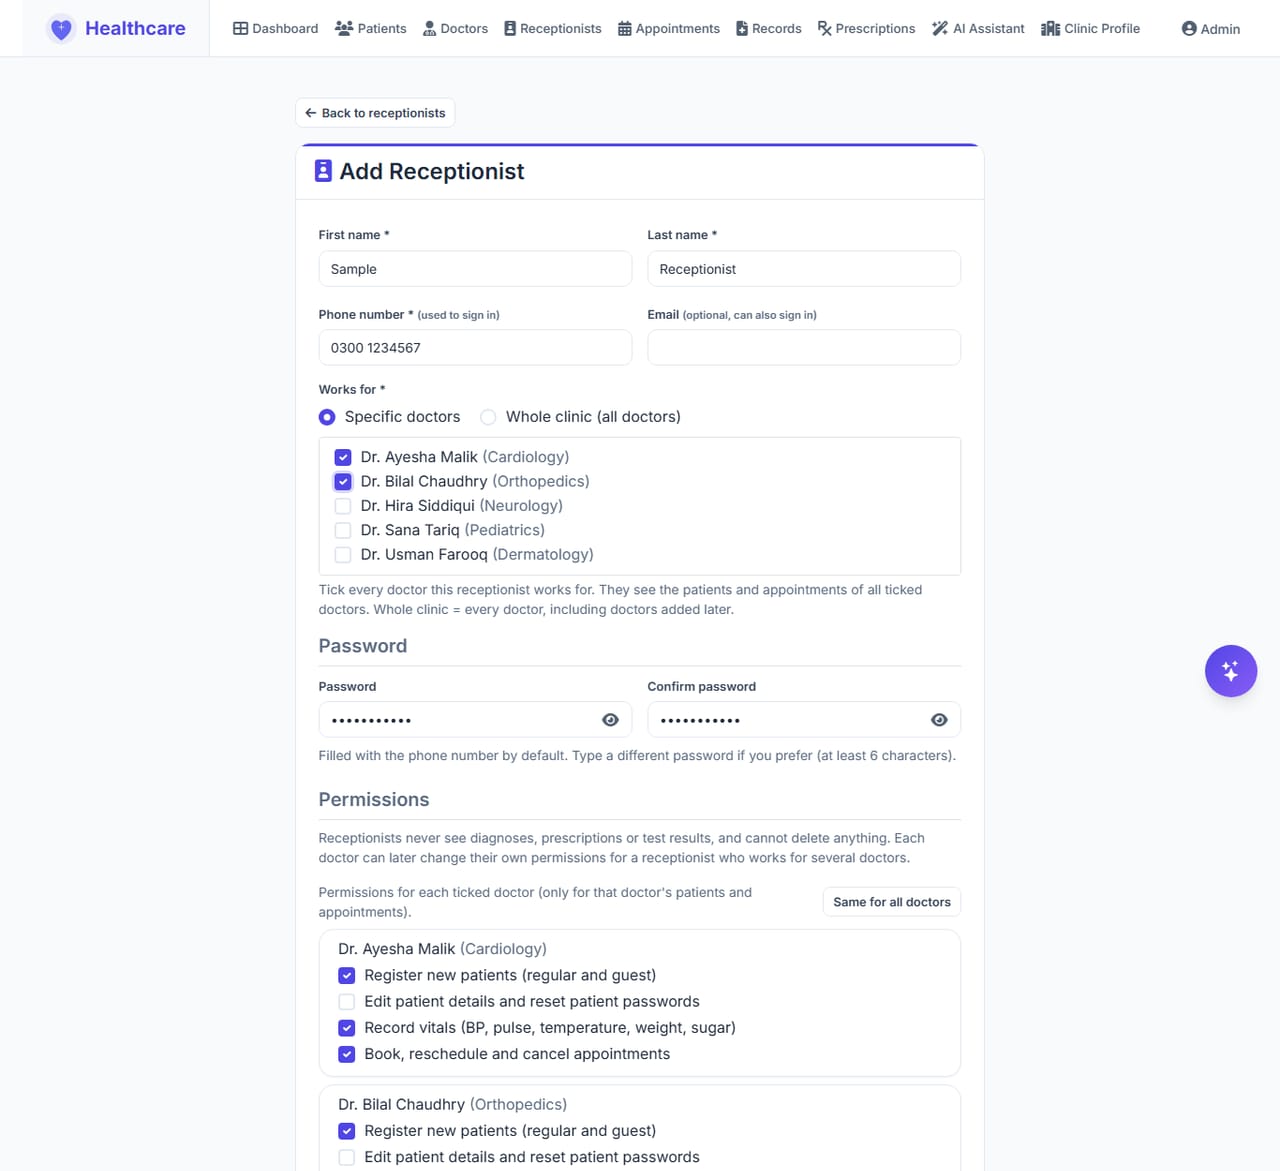
- Click Receptionists → Add receptionist.
- Enter First name, Last name and Phone number. The phone number is the receptionist's login. Email is optional and can also be used to sign in.
- Under Works for, keep Specific doctors and tick every doctor the receptionist works for (one or more), or choose Whole clinic (all doctors) for a receptionist who serves everyone. With Specific doctors, at least one doctor must be ticked.
- Under Password, the phone number is filled in as the password automatically. Keep it, or type a different password (at least 6 characters) in Password and Confirm password.
- Under Permissions, tick what the receptionist may do: register new patients; edit patient details and set patient passwords; record vitals; book, reschedule and cancel appointments; and the three prescription and result rights, which are off until you tick them: View prescriptions (medicines only, no diagnosis), Print prescriptions (the full sheet; it includes the diagnosis) and Upload test results for patients (what each one shows is explained in 4.12). With Specific doctors, each ticked doctor has their own box of permissions (so the receptionist can have different rights for different doctors); click Same for all doctors to copy the first doctor's permissions to the others. With Whole clinic (all doctors), one set of permissions applies.
- Click Create receptionist. The list opens with a message confirming the login and password.
- Tell the receptionist their login (the phone number) and the password.
If a receptionist forgets the password, use Set password (3.5) to give them a new one.
3.5 Change, deactivate or remove a receptionist
- Click Receptionists, then Edit on the receptionist.
- Change the name, phone number, Works for (tick or untick doctors, or switch to Whole clinic (all doctors)) or Permissions (for each doctor separately) as needed.
- To stop the receptionist from signing in, untick Account active. Tick it again to allow access.
- Click Save changes.
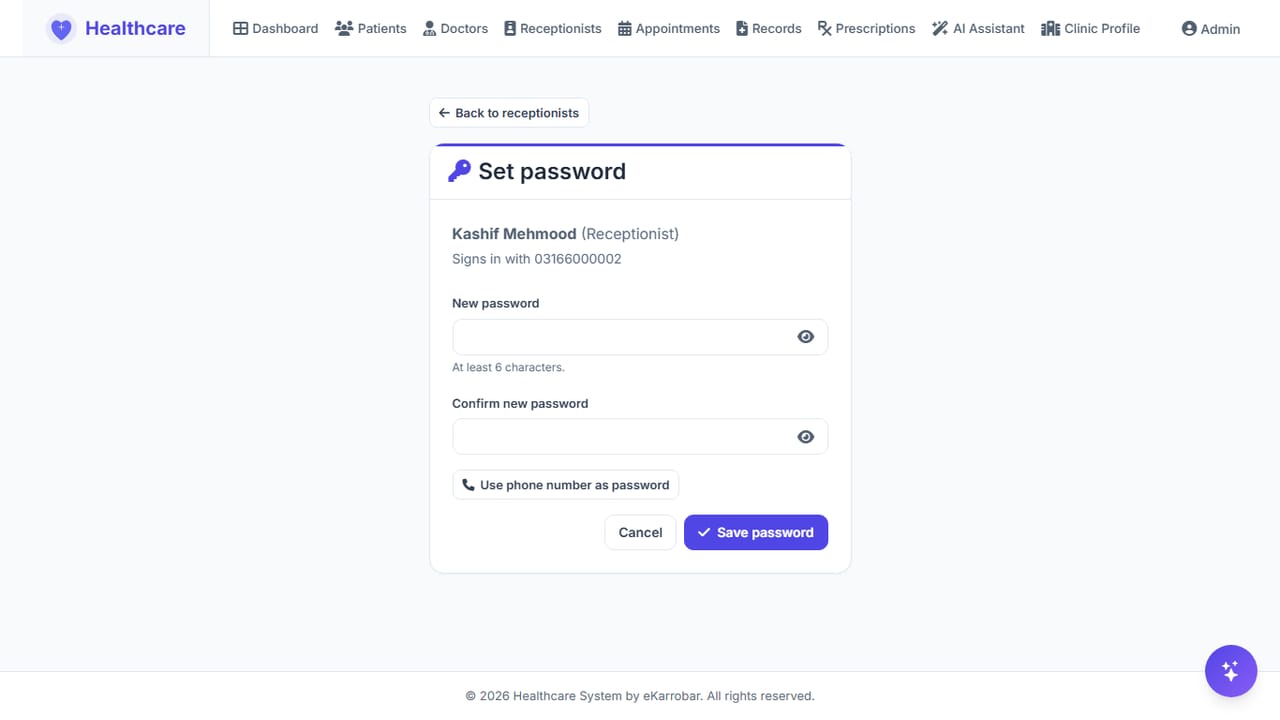
- Forgotten password: on the Receptionists list, click Set password. Type the New password and Confirm new password (or click Use phone number as password), and click Save password. They sign in with exactly the password you set and can change it later from Change password.
- Staff member has left: click Remove. The login is deleted; patients and appointments they created are kept.
Only the Admin can edit, set the password of, or remove a receptionist who works for more than one doctor. The Works for column of the Receptionists list shows every doctor the receptionist works for, and the Permissions column shows the permissions per doctor. A doctor can change their own permissions for a shared receptionist (4.12); that never changes the other doctors' permissions.
3.6 Register patients
The Admin registers patients in the same way as the front desk (5.2 and 5.3). The Admin also selects Registered for doctor.
3.7 Find a patient and view the full history
- Click Patients. Type a name in the search box, or filter by blood group or gender.
- Click the eye icon on the patient's row (the calendar icon next to it books an appointment).
- The left card shows the profile, emergency contact, allergies and Signs in with (the patient's login). The tabs show Appointments, Vitals, Medical Records, Prescriptions and Medical Tests.
- The buttons on the page are Book Appointment, Record vitals, Edit details and Set patient password (for a patient who forgot the password).
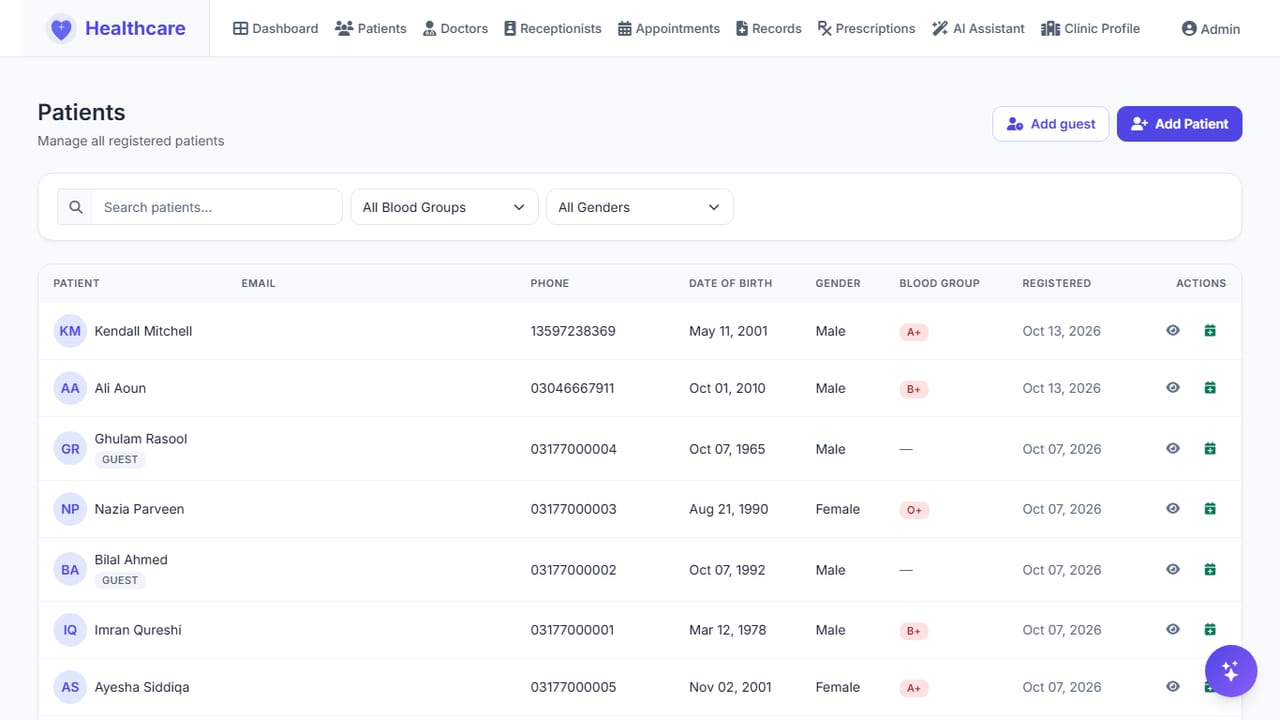
On screens narrower than about 1280 pixels the Email and Registered columns are hidden so the row buttons stay visible. Open the patient to see those details.
3.8 Book, reschedule, cancel or delete an appointment
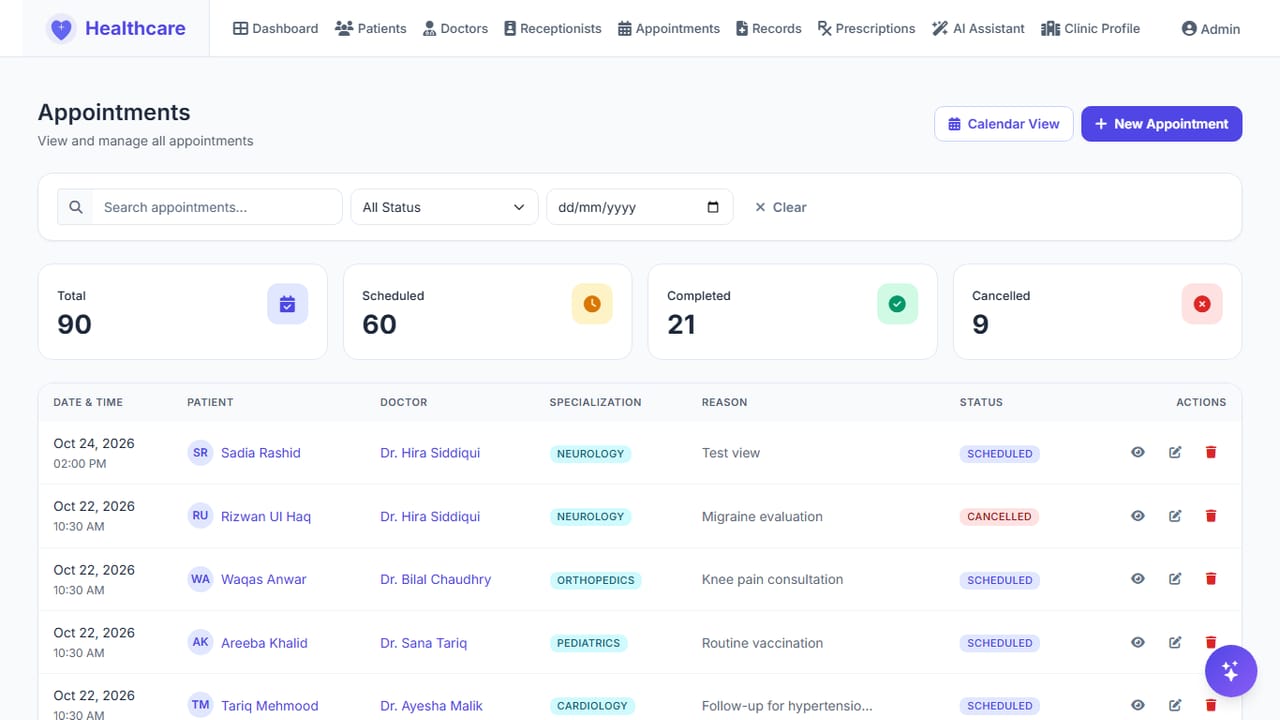
- To book: click Appointments → New Appointment, or Book Appointment on a patient's page. Select the patient, doctor, date, time and reason, then submit.
- To change one: on Appointments, click the eye icon on the appointment.
- Click Edit / Reschedule to change the date, time, doctor, status, reason or notes, then Save Changes.
- Click Cancel appointment to keep it on record with the status Cancelled. An appointment that is still Scheduled after its date and time shows as Past due (amber). If the patient did not come, click Mark as no show (confirm the question); the status becomes No show. Click Edit / Reschedule on a No show appointment to give it a new future date and it goes back to Scheduled. The Admin, the doctor and a receptionist who may manage that doctor's appointments can do this; patients cannot.
- Click Delete to remove it permanently. Only the Admin can delete appointments.
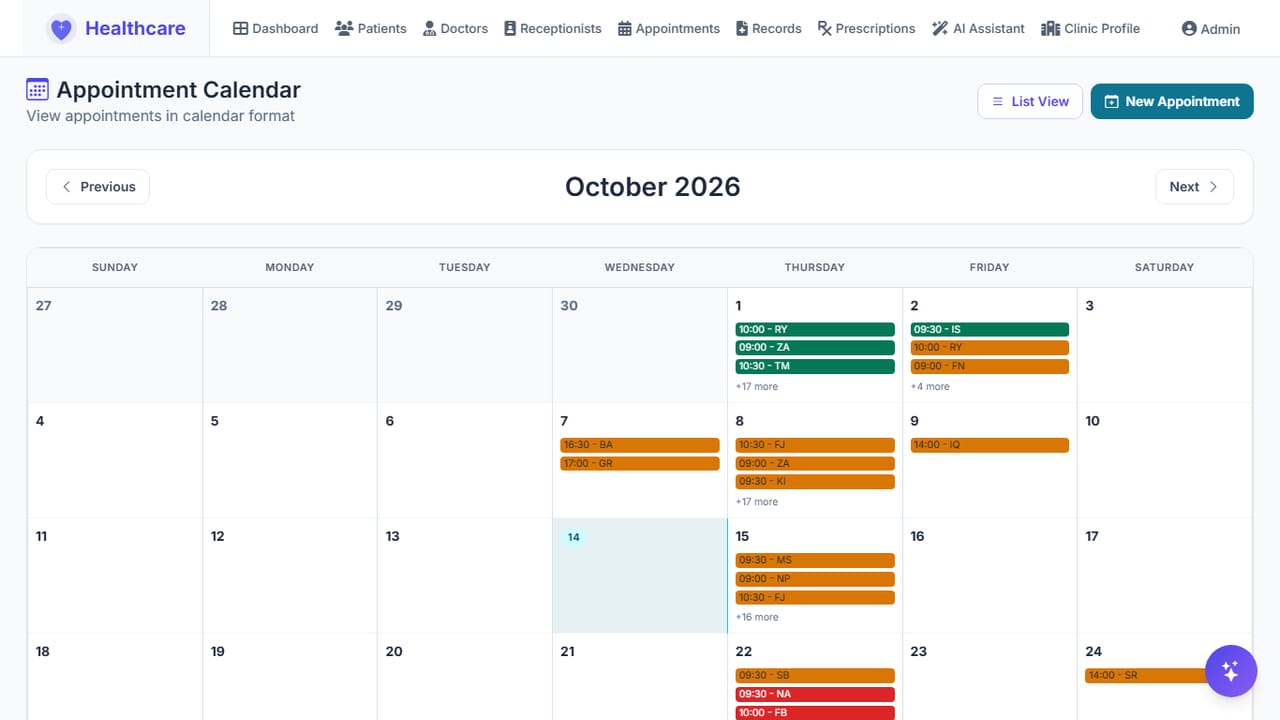
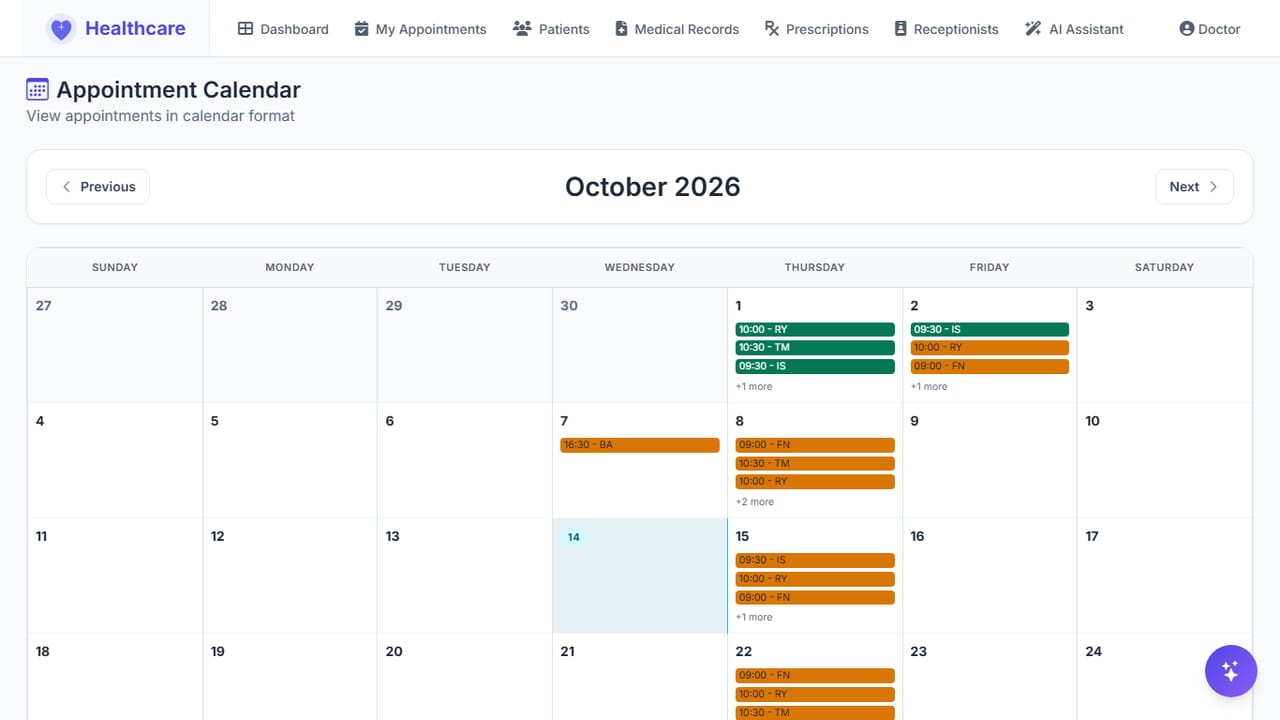
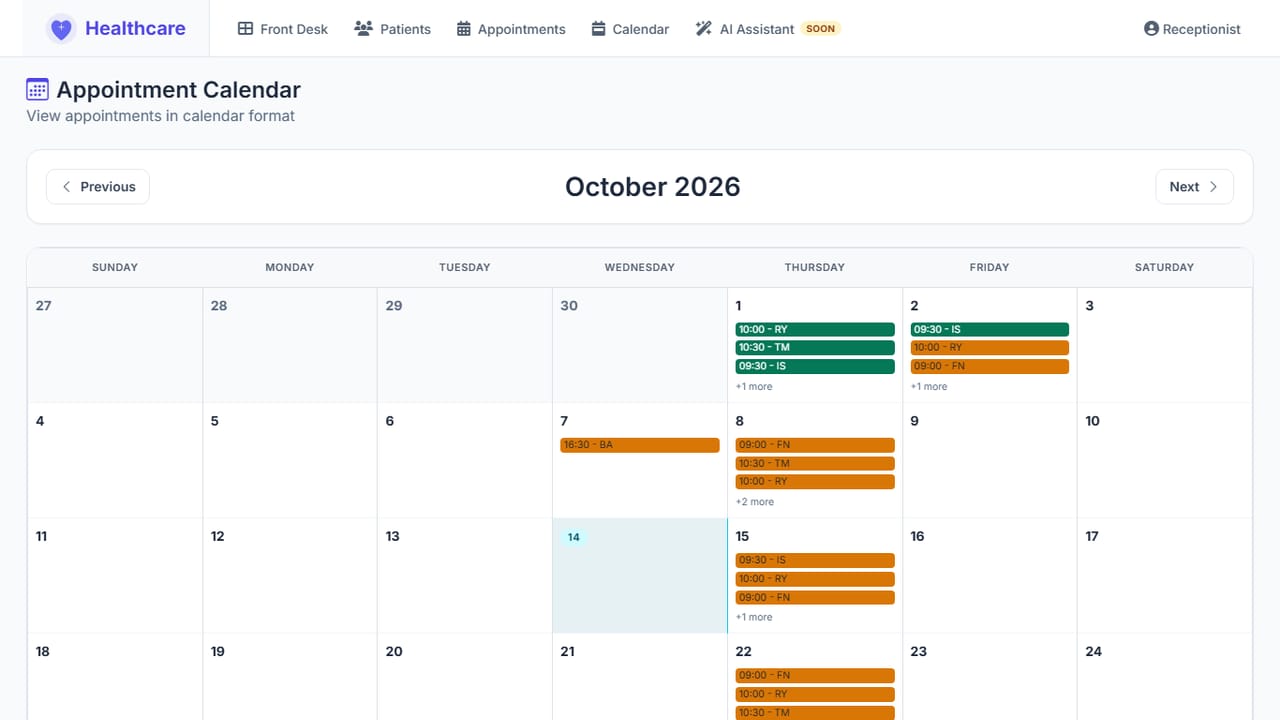
To see the month at a glance, click Calendar View on Appointments. Each day lists the appointments with their time and the patient's initials, coloured by status (Scheduled, Past due, Completed, Cancelled, No show); today is highlighted. Click an entry to open the appointment, use Previous and Next to change the month, and List View to go back. A day with many appointments shows "+N more".
3.9 View medical records and prescriptions
- Records: every visit record in the clinic. Open one to see details and print the prescription.
- Prescriptions: every prescription, one row for each visit with all its medicines. The eye icon opens the visit's record and the Print icon opens the printable prescription sheet. Only the doctor edits prescriptions.
3.10 Use the Admin assistant
- Click the chat button at the bottom right, or AI Assistant in the menu.
- Type a question in English or Roman Urdu, for example "How many appointments are scheduled today?" or "Aaj ki appointments ka summary do".
- The Admin assistant can also read vitals, book, update, cancel and complete appointments, register patients (regular or guest), convert a guest to a regular patient, and update patient, doctor and visit details. It asks for confirmation before any change. It cannot delete data, add doctors, or set or change any password (use Set password for that).
- Click + to start a new conversation.
3.11 Read the audit log
The audit log records who opened or changed patient data, and when. It is for the Admin only and protects patient privacy: if you need to know who looked at a record, look here.
- Click Audit log in the menu (on a narrow screen it is under More).
- The newest entries are at the top, 50 per page. Each row shows the time, the user and their role, the action (for example View, Create, Update, Download, Login, Failed sign-in), what it concerned, the patient, a short description and the IP address.
- To narrow the list, type a user email, pick an action or type, type a patient name, or choose a date range, then click Filter. Clear removes the filters.
- Click Export CSV to download the filtered rows for a spreadsheet.
The log never stores passwords or medical text such as diagnoses, only names and what was done. If the page says the audit log table has not been created yet, ask your technical contact to apply the update to the database.
4. Doctor Guide
| This role can | This role cannot |
|---|---|
| View patients; run visits (medical records, prescriptions, lab tests); print prescriptions; book and manage own appointments; record vitals; design the prescription; manage own receptionists; use the Doctor assistant. | See other doctors' records; delete appointments; add doctors; change the clinic profile. |
Menu: Dashboard · My Appointments · Patients · Medical Records · Prescriptions · Receptionists · AI Assistant
4.1 View your appointments
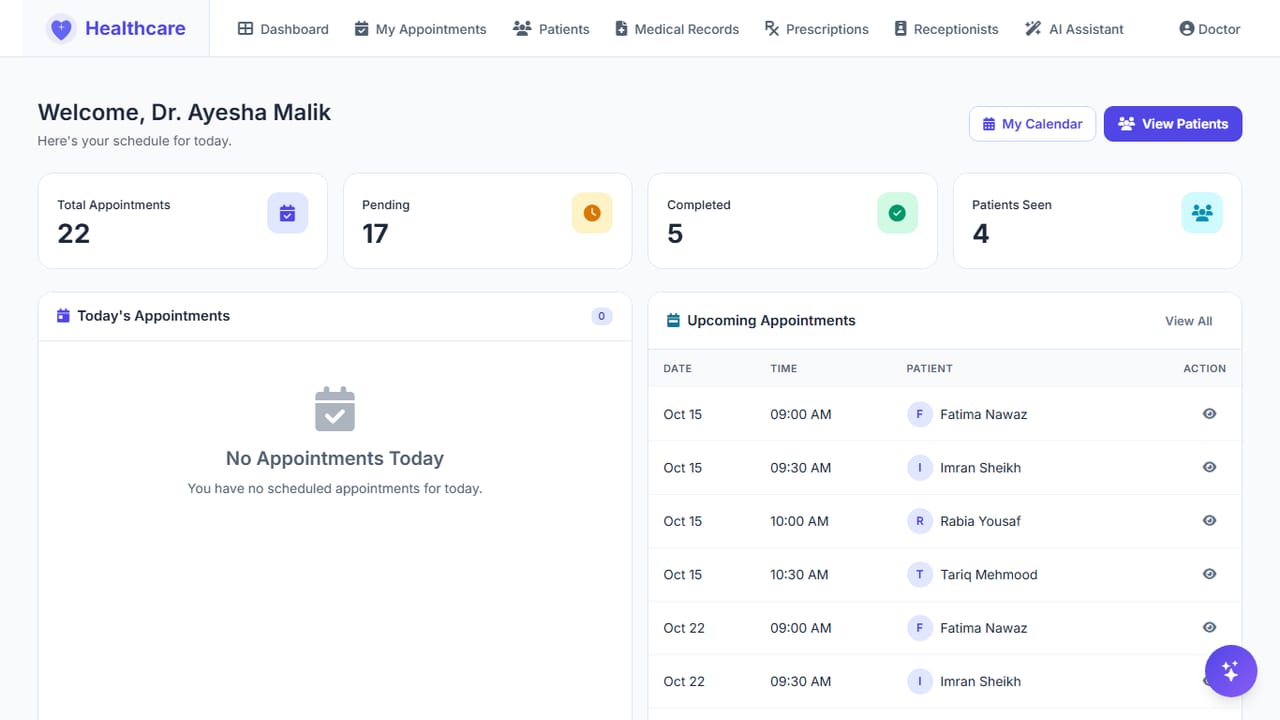
- Click Dashboard for today's schedule, or My Appointments for the full list.
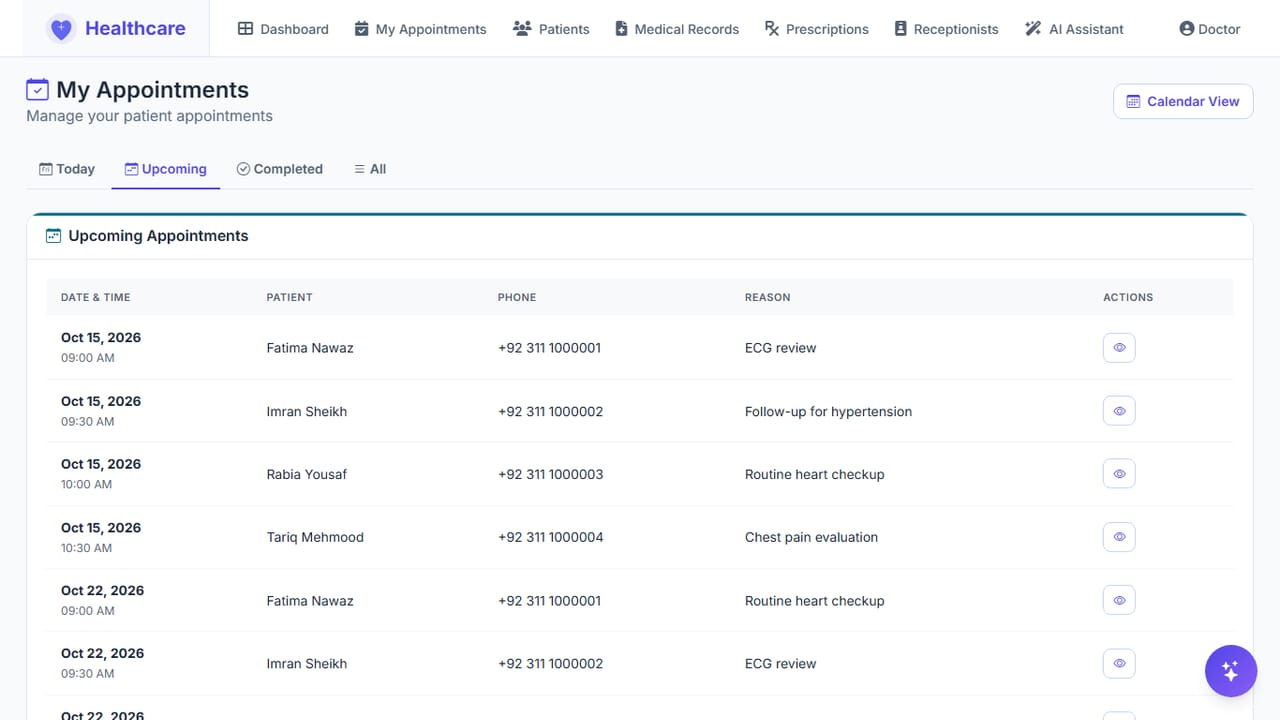
- On My Appointments, use the tabs Today, Upcoming, Completed and All, or click Calendar View.
- On Today, click Start on an appointment to open it. On the other tabs, click the eye icon.
Click Calendar View (or My Calendar on the dashboard) to see the month: each day shows the time and the patient's initials, coloured by status, with today highlighted. Click an entry to open it and use Previous and Next to change the month. On a phone the month is also listed below the grid.
4.2 Review the patient before the visit
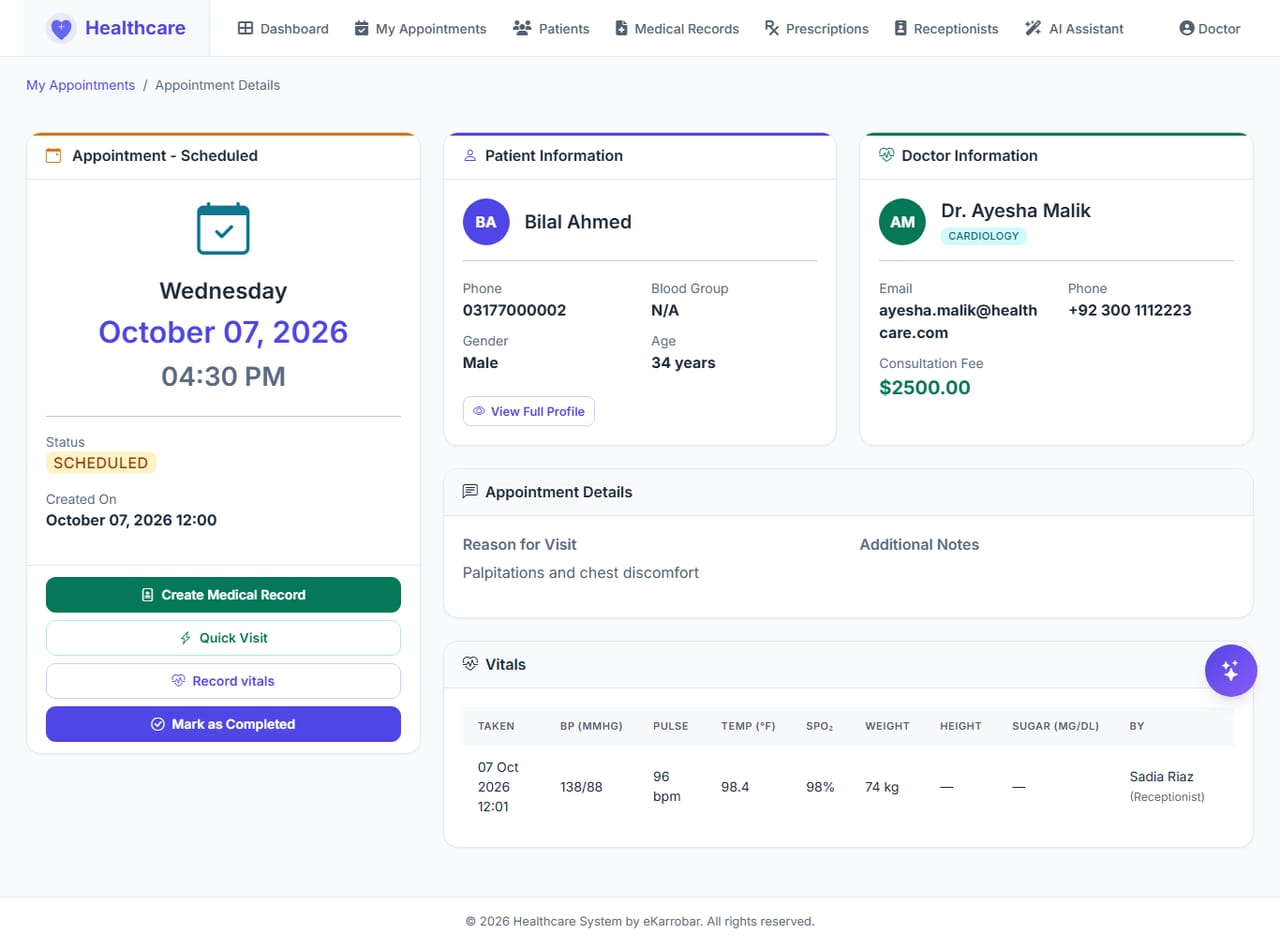
The appointment page shows the patient's details, the reason for the visit and the Vitals recorded at the front desk (time, BP, pulse, temperature, SpO₂, weight, height, blood sugar and who took them). Allergies are on the patient's page. The buttons on the left (Create Medical Record, Quick Visit, Record vitals, Mark as Completed) start the visit.
Your Patients list shows only your own patients: those registered for you and those who have had an appointment with you. A patient of another doctor cannot be opened; you get the message "Patient not found" and the list. (When that patient books an appointment with you, they appear in your list.) The Admin sees all patients. On a patient's page, the Medical Records, Prescriptions and Medical Tests tabs list only the entries you wrote or ordered yourself. What other doctors recorded for the same patient is not shown to you; only the Admin sees everything.
4.3 Record the visit with Quick Visit (recommended)
- Open the appointment and click Quick Visit.
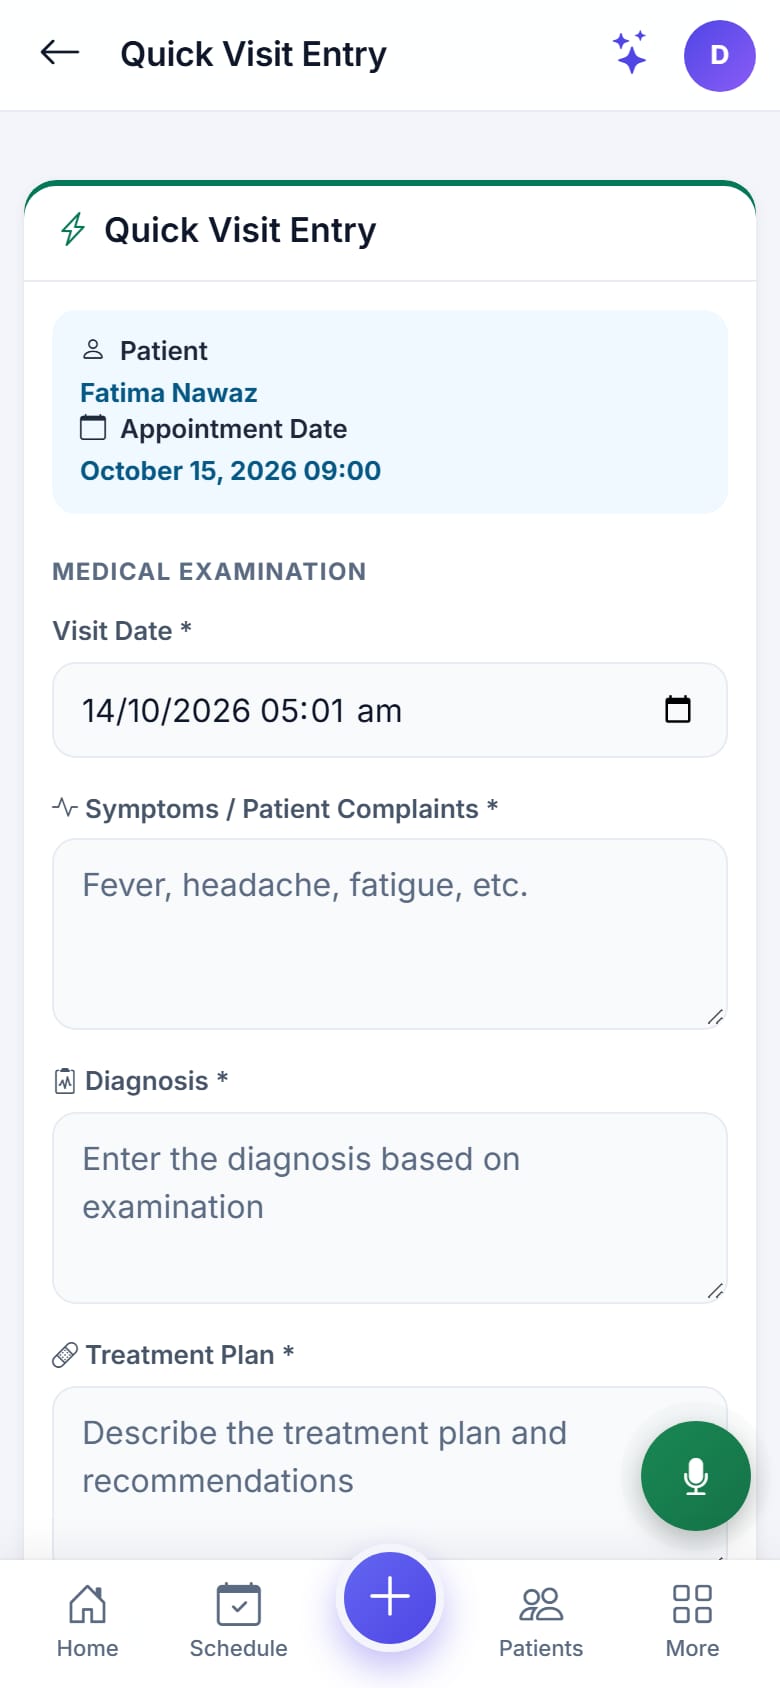
- Enter symptoms, diagnosis, treatment and notes. To dictate instead, tap the microphone (Dictate visit details by voice), speak clearly. A recording bar appears (like a voice message): Cancel (trash, nothing is sent), Pause / Resume, and Send (only then is the recording turned into text). If the phone screen turns off or you leave the app, the recording is paused, not sent; open the page again and press Resume or Send. A small message (toast) at the bottom right tells you what is happening: Recording (with the time), Processing your dictation, then Visit details filled, or Could not use the recording with the reason. The message disappears by itself after a few seconds. The form fills in, including medicines with frequency and any tests. Allow the microphone when your phone or browser asks. Always check the text before saving, because spoken medicine names can be misheard.
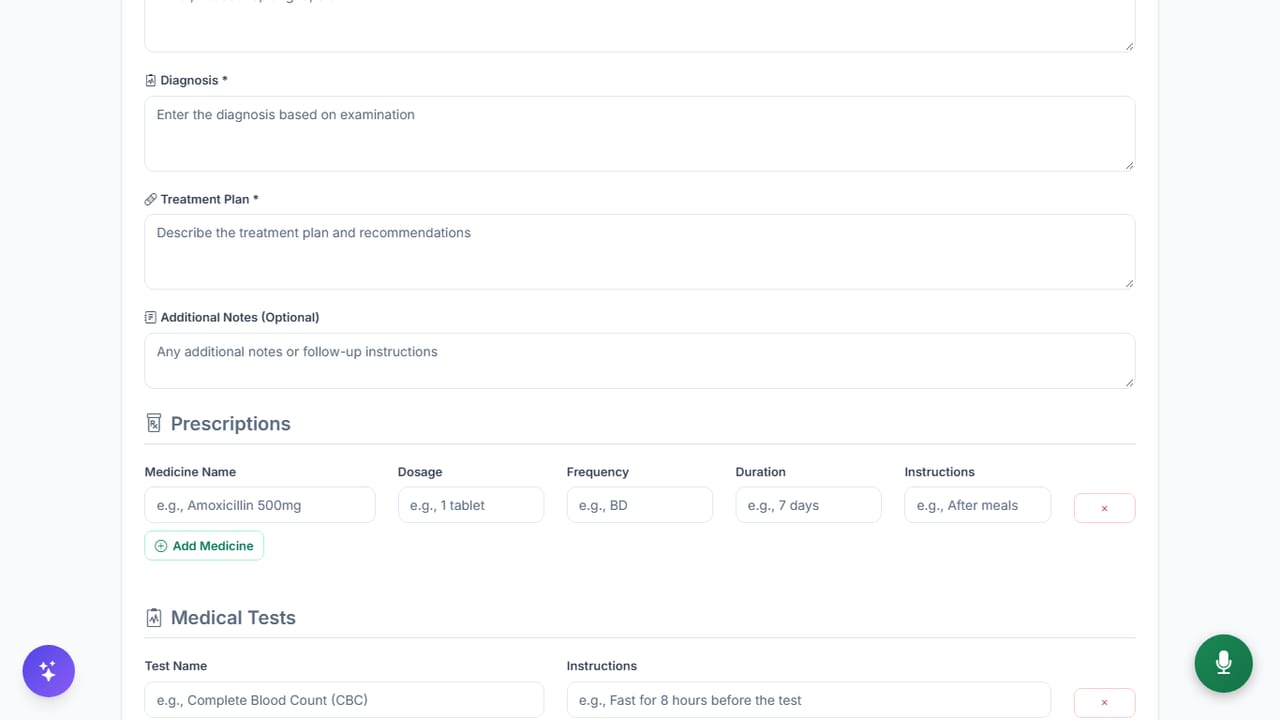
- For each medicine, enter Medicine Name, Dosage, Frequency (type it or pick a suggestion such as BD or TDS; click in the box to see all suggestions), Duration and Instructions. Click Add Medicine for another one.
- For each lab test, enter Test Name and instructions. Click Add Test for another one.
- Optional: tick Schedule Follow-up Appointment and choose the Follow-up Date & Time.
- Click Save Visit.
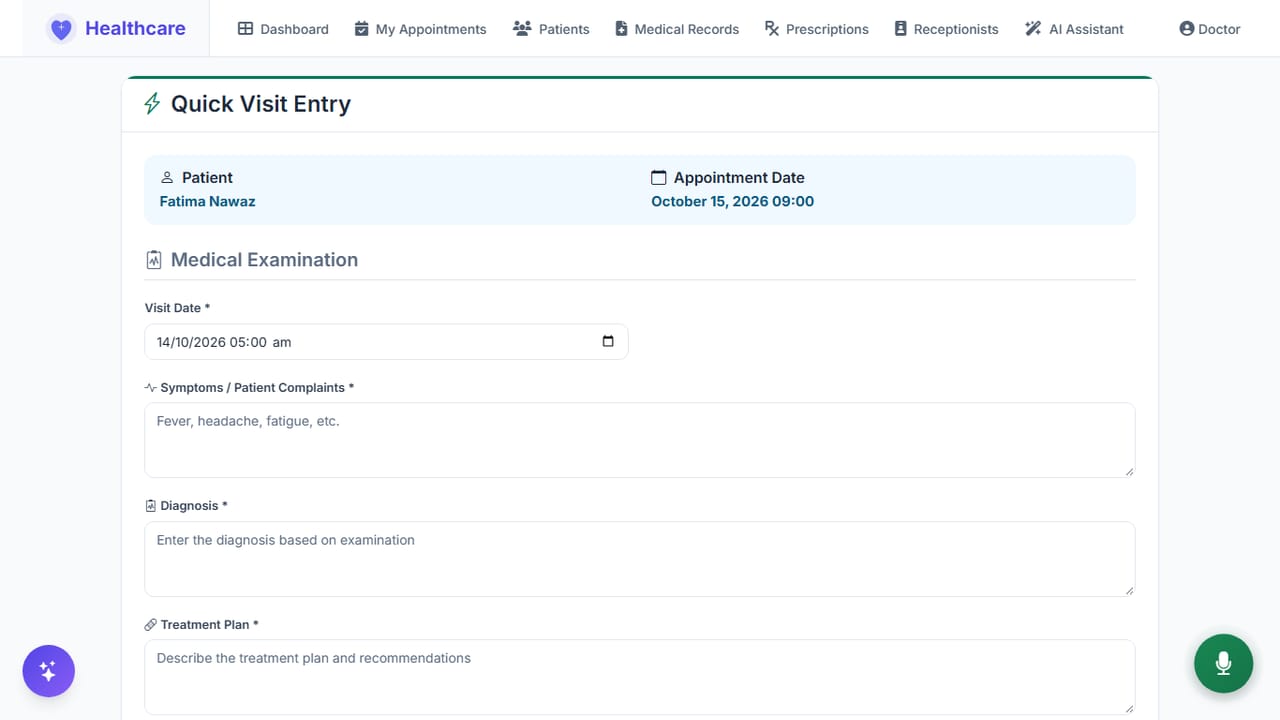
When you name the times of day while dictating a medicine (for example "morning and evening"), the Frequency is filled for you: morning and evening is BD, and morning, afternoon and evening is TDS. Check it before saving.
4.4 Record the visit step by step
- Open the appointment and click Create Medical Record.
- Enter symptoms, diagnosis, treatment and notes. Optional: tick Schedule Follow-up Appointment (7 days later is suggested).
- Click Create Medical Record.
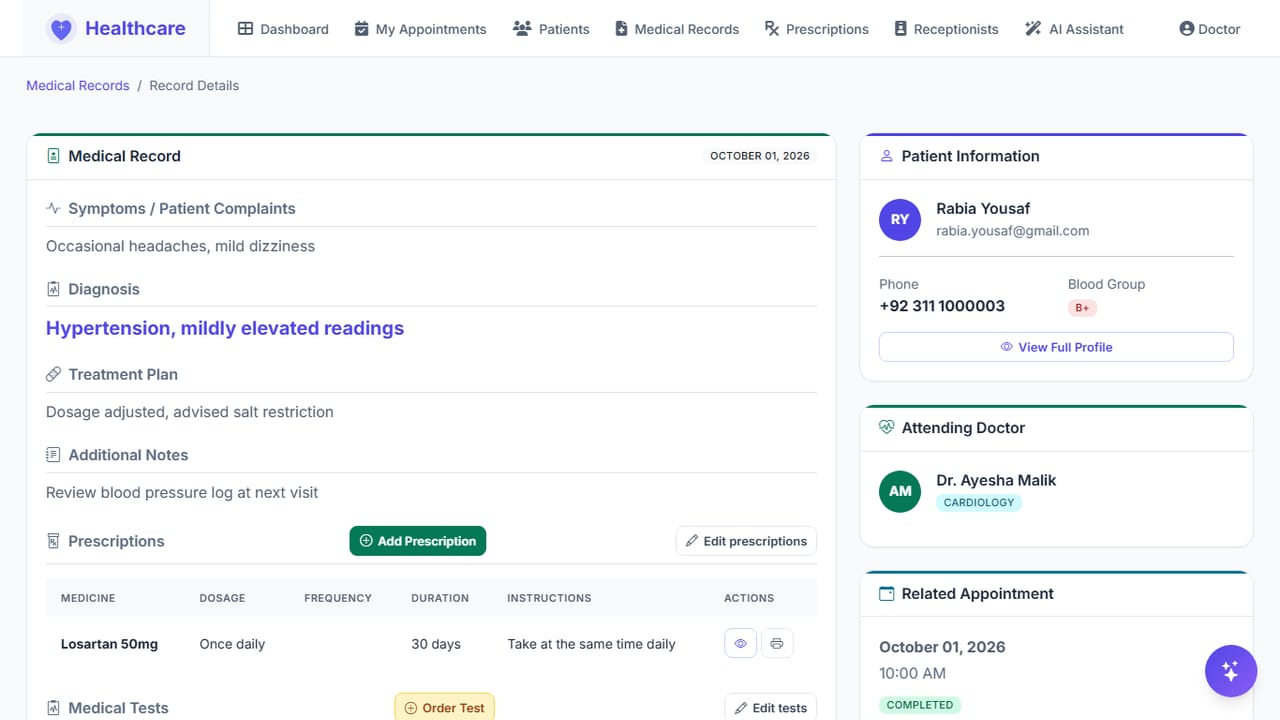
- On the record page, use Add Prescription (4.5) and Order Test (4.6).
4.5 Add or edit a prescription
One visit has one prescription, and it can hold any number of medicines. Add them all in one go.
- Open the medical record and click Add Prescription. (Or click Prescriptions → New Prescription and pick the record.)
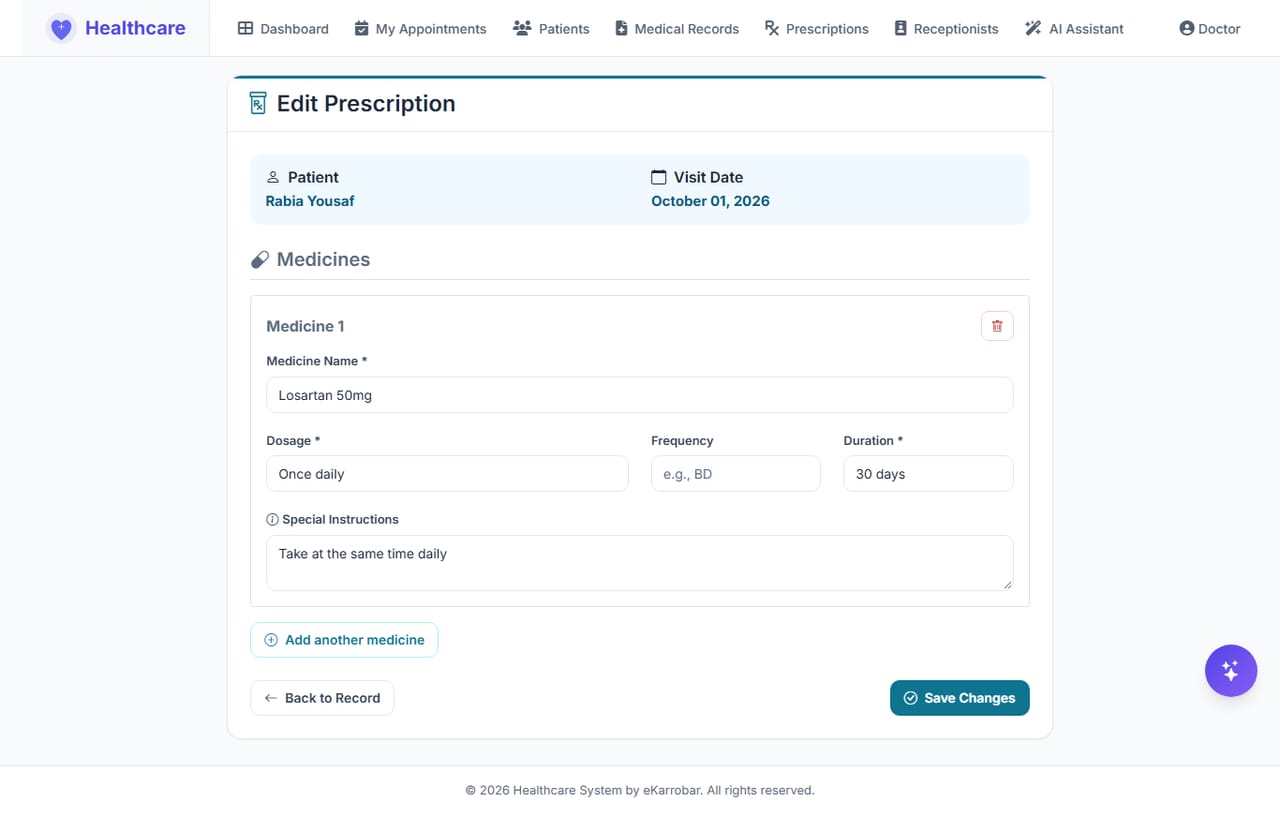
- For the first medicine, enter Medicine Name, Dosage, Frequency (click in the box to see the suggestions) and Duration, and if needed Special Instructions.
- Click Add another medicine for each further medicine. Use the red button at the top right of a medicine to remove it again. Rows you leave empty are ignored.
- Click Save Prescription. All medicines are saved together; if something is missing (for example a dosage), nothing is saved and a message tells you what to fix.
Change a prescription later. Use Edit prescriptions on the medical record page (next to Add Prescription), or the pencil button on the visit's row in Prescriptions. The Edit Prescription page shows every medicine of that visit in one form:
- Change any field of any medicine.
- To delete a medicine, click the trash button at the top right of it and confirm. It is deleted when you save.
- Click Add another medicine to add one.
- Click Save Changes. The record page confirms how many medicines were updated, added and removed. Back to Record leaves without saving.
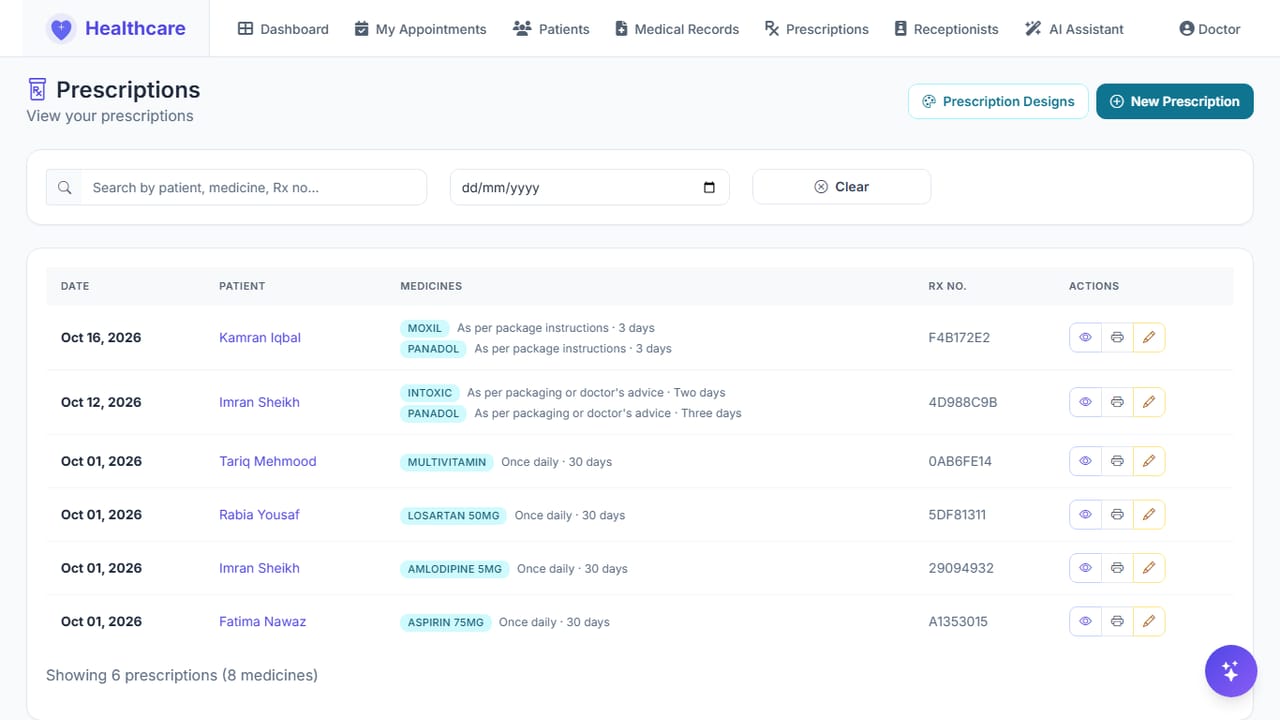
The Prescriptions page lists one row per visit: the date, the patient, all medicines of the visit (with dosage, frequency and duration) and the Rx no. that is also printed on the sheet. The buttons on the row are the eye (View, opens the visit's medical record), the printer (Print) and the pencil (Edit prescription). Type a patient, a medicine or an Rx number in the search box, or pick a date, to narrow the list.
4.6 Order a lab test, edit tests and review the result
- Open the medical record and click Order Test.
- Enter the Test Name and instructions for the patient, then click Order Test.
- The patient sees the test under My Tests and uploads the report.
- When the report is uploaded, open the test (patient page → Medical Tests tab, or the medical record). The page shows a preview of the report: a PDF is shown inside the page and a picture (JPG or PNG) is shown right in the page. Click Open full size to see it in its own window, or Download Result to save it. In the mobile app a PDF shows as a file card; tap Open full size to read it.
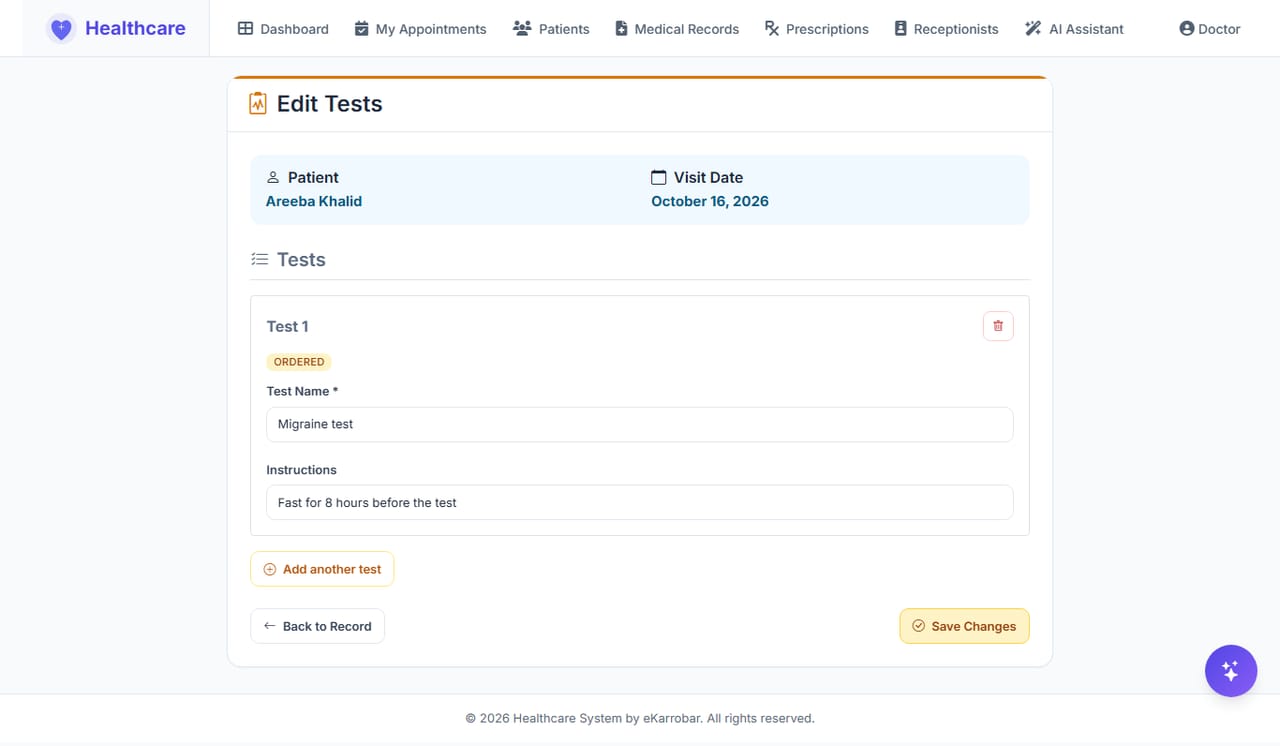
Change the tests of a visit. Click Edit tests on the medical record page (next to Order Test). The Edit Tests page lists every test of the visit with its status (Ordered or Uploaded):
- Change the Test Name or Instructions of a test. The status and the uploaded result never change here.
- To delete a test, click the trash button at the top right of it and confirm. If the patient already uploaded a result, the result file is deleted with it, and the confirmation says so.
- Click Add another test to order one more.
- Click Save Changes.
Only you (the doctor who ordered the test), the patient and the Admin can open a result. Receptionists never see test results, even if you let them upload a file for a patient (4.12). Only the patient can replace or delete the uploaded file (6.5).
4.7 Print the prescription
- Open the medical record and click the print icon (Print visit prescription), or open Prescriptions and click the Print icon.
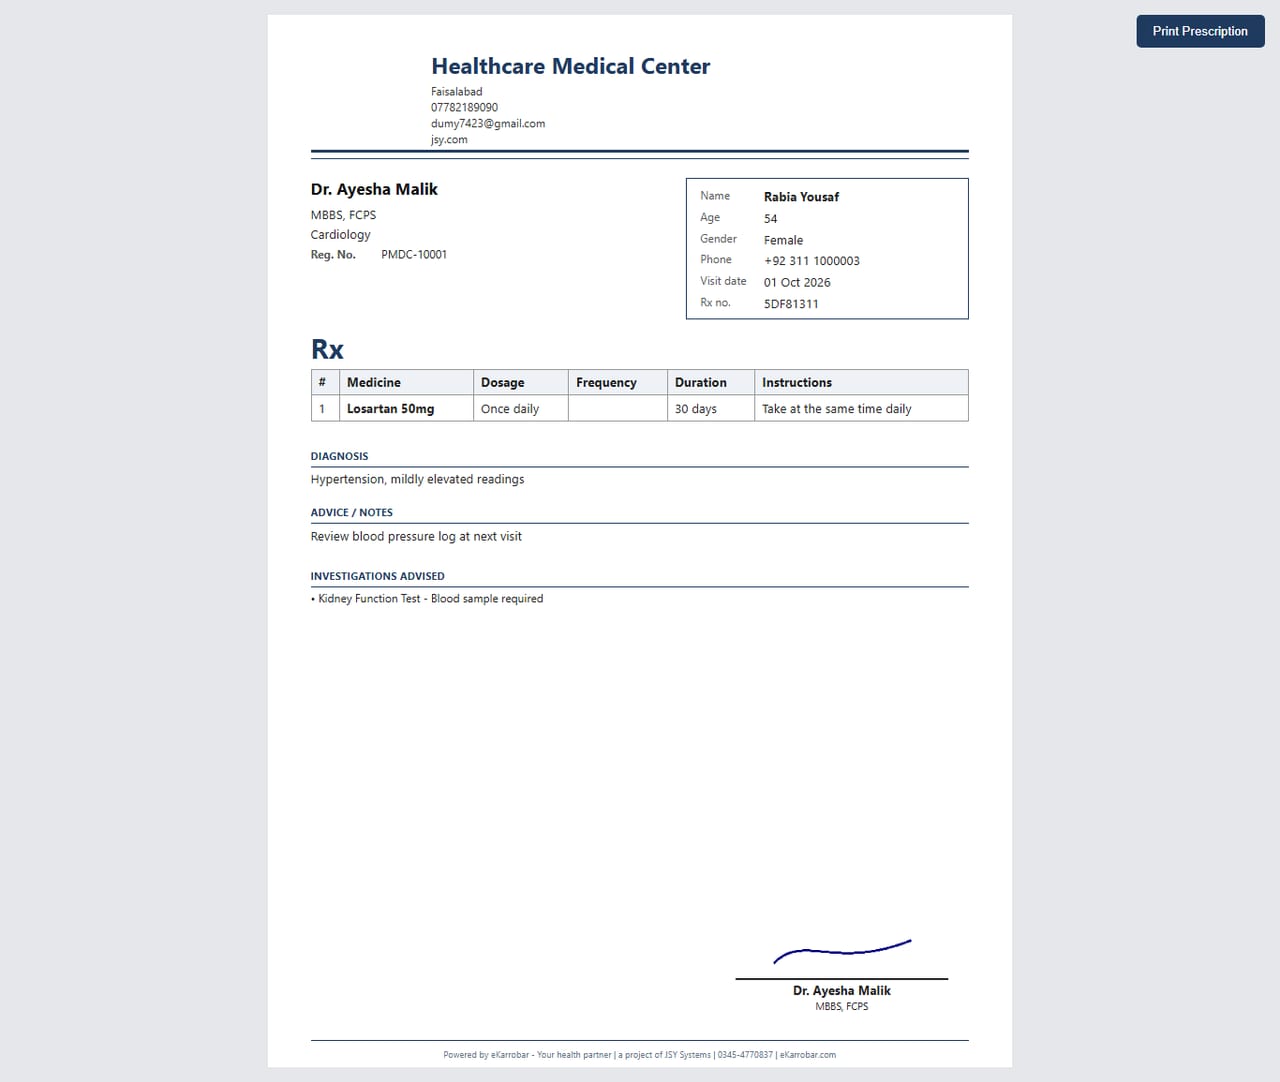
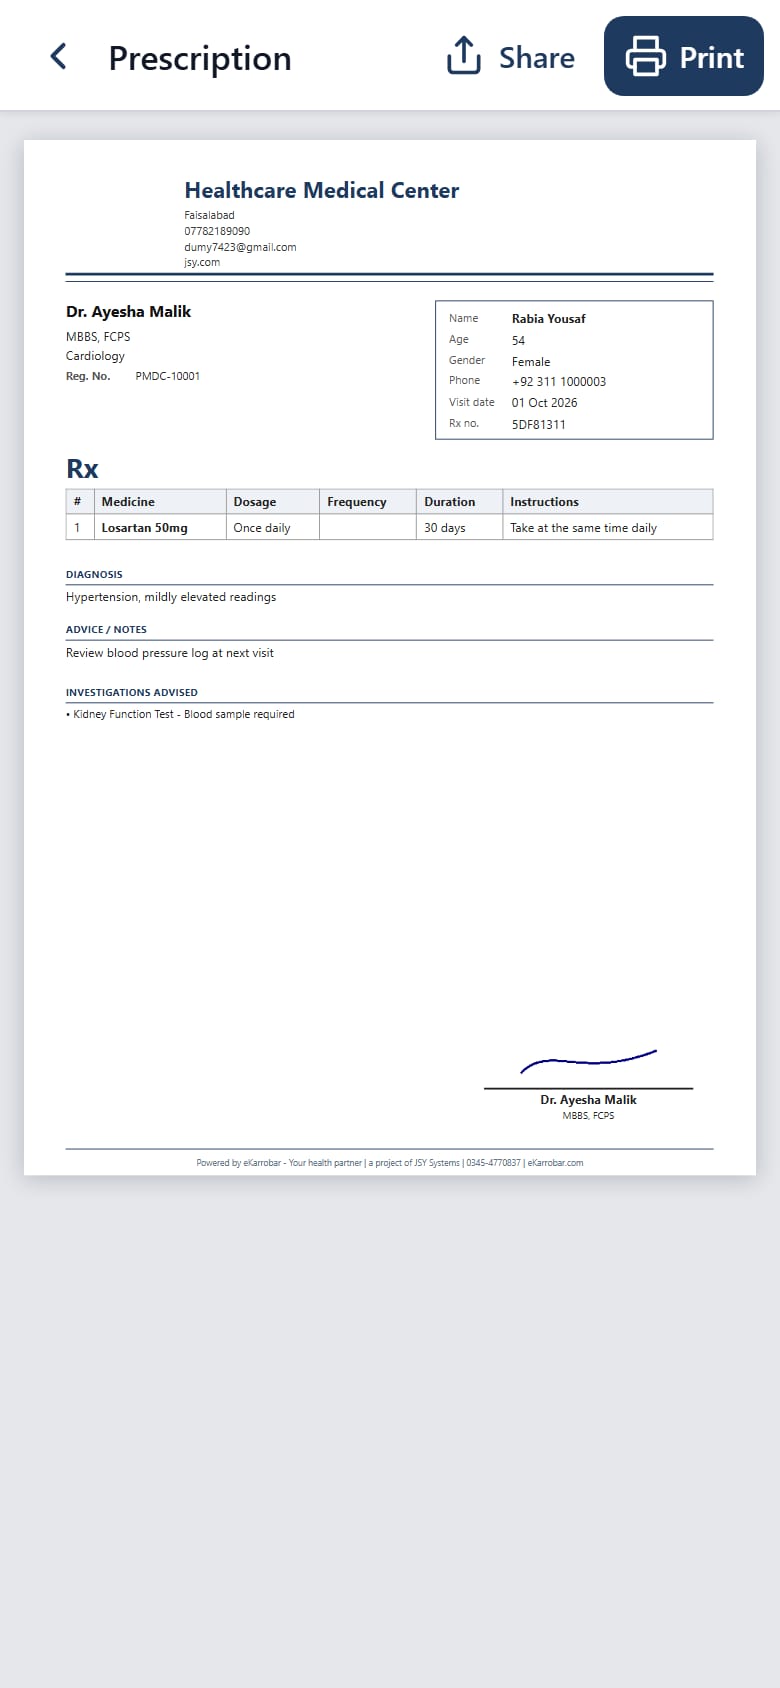
- The sheet opens with your selected design: clinic header with logo, address, phone, email and website, your details, the patient box, medicines, diagnosis, advice and your signature. A fixed line ("Powered by eKarrobar ...") is printed at the bottom of every page.
- Click Print Prescription.
- In the print window, set Background graphics to on, Margins to None, and Headers and footers to off.
4.8 Complete the appointment
After the visit, open the appointment and click Mark as Completed.
4.9 Front-desk tasks
Doctors can do every front-desk task for their own patients: register patients (5.2, 5.3), book appointments with themselves (5.4), record vitals (5.6) and convert a guest to a regular patient (5.8).
4.10 Upload your signature and update your profile
- Click your role name at the top right, then My Profile.
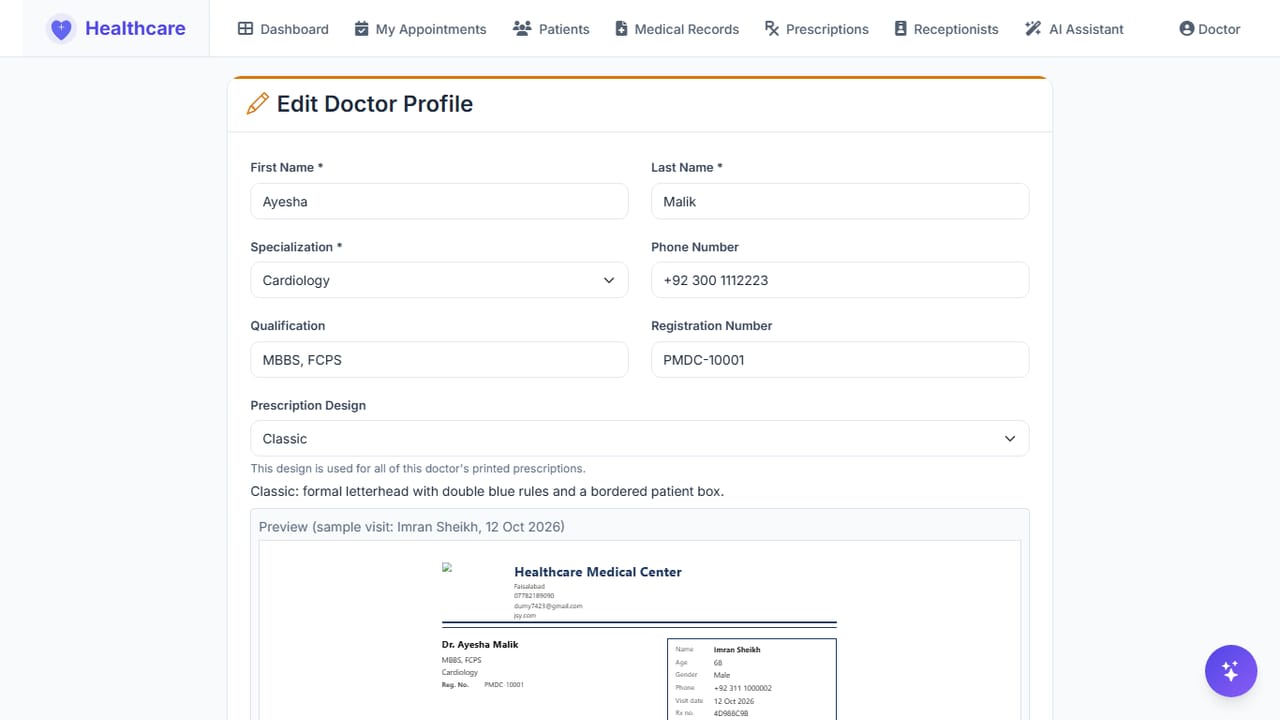
- Click Edit Profile & Prescription Design.
- Update your details. Under Signature Image, choose a PNG or JPG of your signature (up to 2 MB; a white or transparent background prints best).
- Click Save Changes.
4.11 Choose or design your prescription layout
Use a ready-made design
- Click Prescriptions → Prescription Designs.
- Click Preview on Classic or Modern, then Select on the design you want.
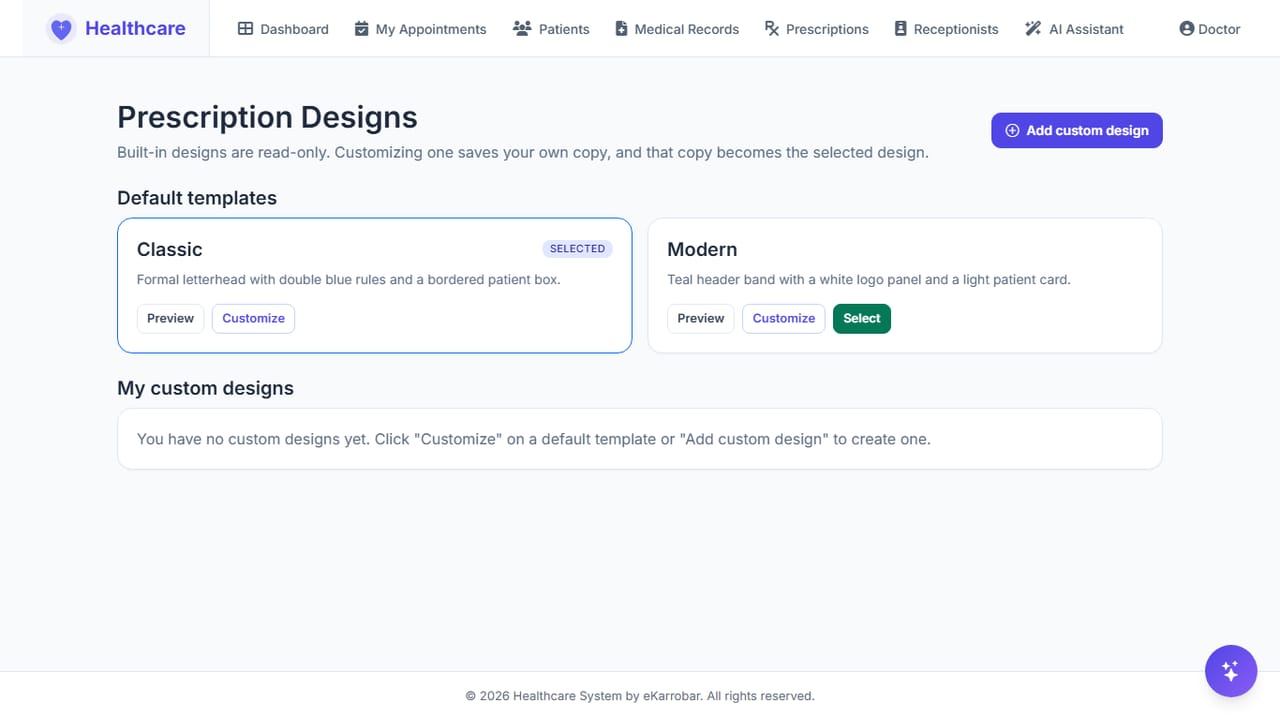
Create your own design
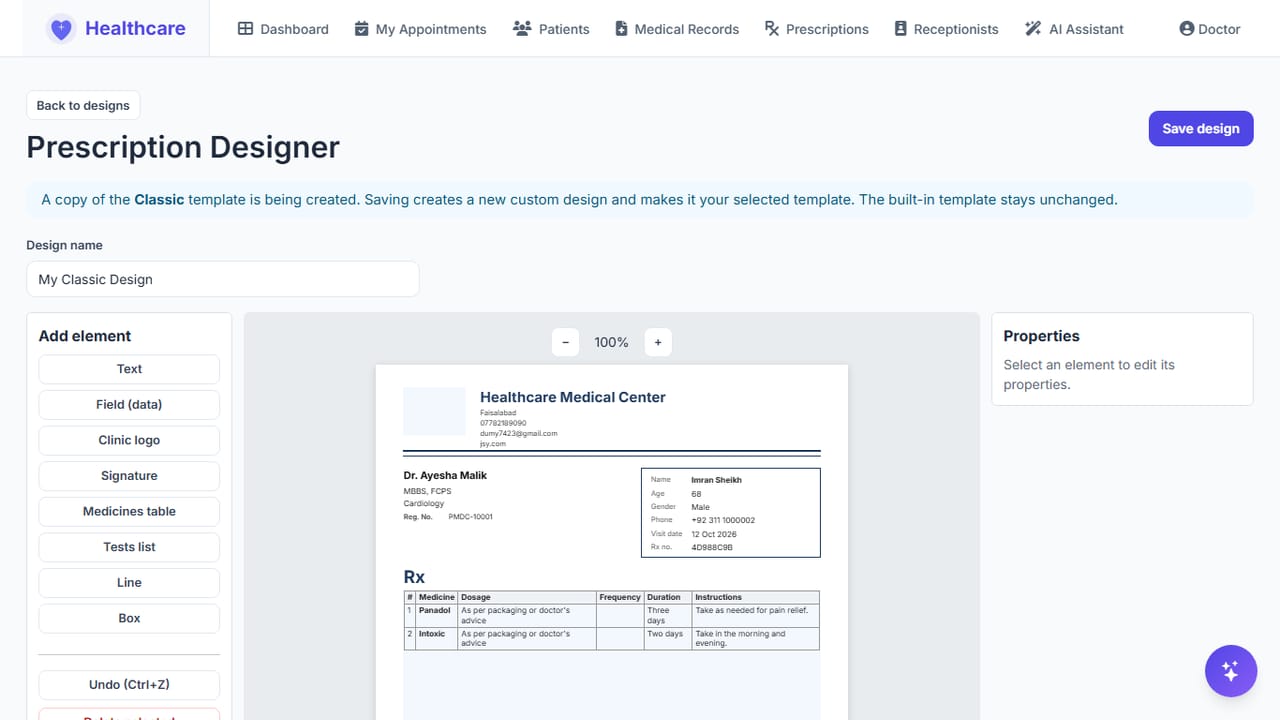
- On Prescription Designs, click Customize on a design, or Add custom design.
- Drag items on the A4 page to move them, and drag the blue corner to resize. Click an item to change its text, size, colour or alignment in Properties.
- Use Add element to add text, data fields (such as patient name or diagnosis), the logo, the signature, the medicines table, the tests list, lines and boxes.
- For items placed below the medicines table, tick Follow medicines table so they move up when the prescription has few medicines.
- Enter a Design name and click Save design. The new design becomes your selected design.
The line at the bottom of every page ("Powered by eKarrobar ...") is fixed. It is printed on every prescription and cannot be moved, edited or removed. The clinic website is part of the header with the clinic name, address, phone and email; to show it on a design you made yourself, add the Clinic website field (under Field (data)) to the header.
4.12 Manage your receptionists
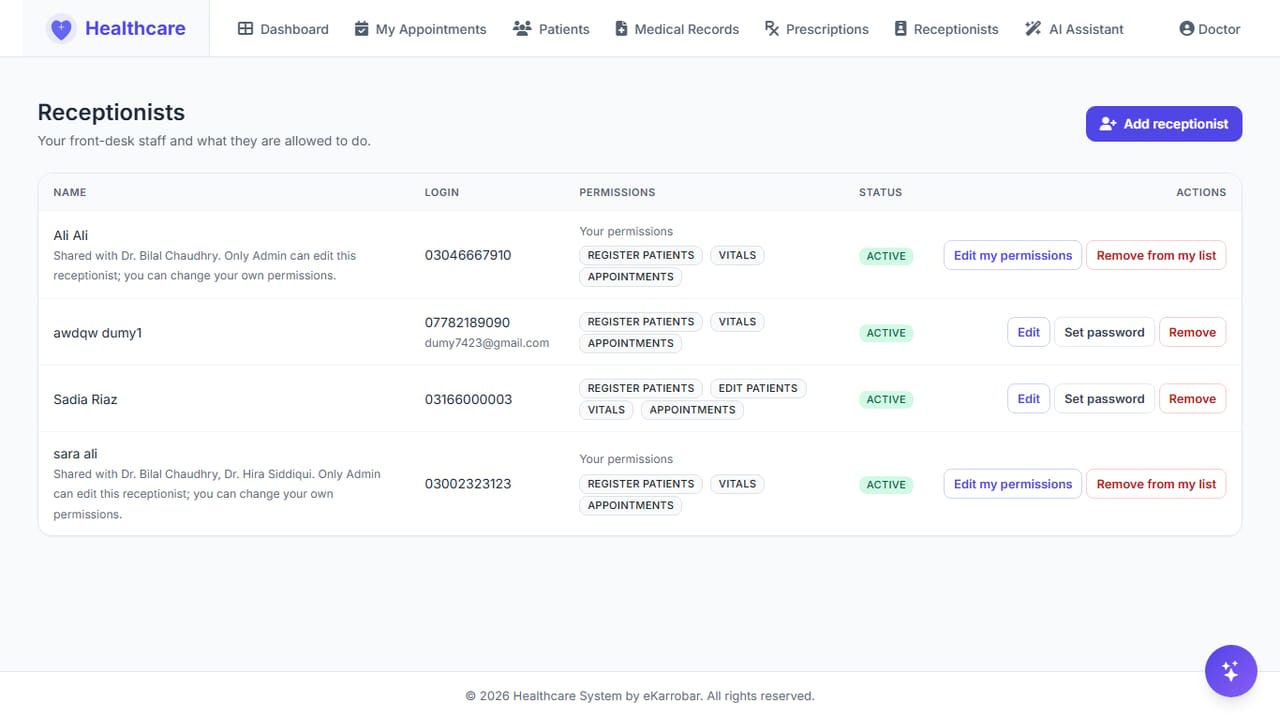
- Click Receptionists → Add receptionist.
- Enter the name and Phone number (the login). The password is filled with the phone number; keep it or type your own.
- Tick the Permissions and click Create receptionist. Tell the receptionist their login and password. The last three permissions are off until you tick them, and each has a note under it saying what it shows:
- View prescriptions (medicines only, no diagnosis): the receptionist gets a Prescriptions page with the medicines of your patients' visits (name, dosage, frequency, duration, instructions). It never shows the diagnosis, notes or tests.
- Print prescriptions (the full sheet; it includes the diagnosis): the receptionist can open and print the same sheet you print, so the diagnosis is visible to them. Tick it only if you are happy with that. It also gives them the Prescriptions page, with a Print button on each of your visits.
- Upload test results for patients: the receptionist sees the names of your tests that still wait for a result and can upload the file a patient hands in. They cannot open, download, replace or delete any result, and they do not see tests that already have a result.
- To change permissions or block access later, click Edit, change the permissions or untick Account active, and click Save changes. (This is for a receptionist who works only for you.)
- Use Set password to give a new password, and Remove when the receptionist leaves.
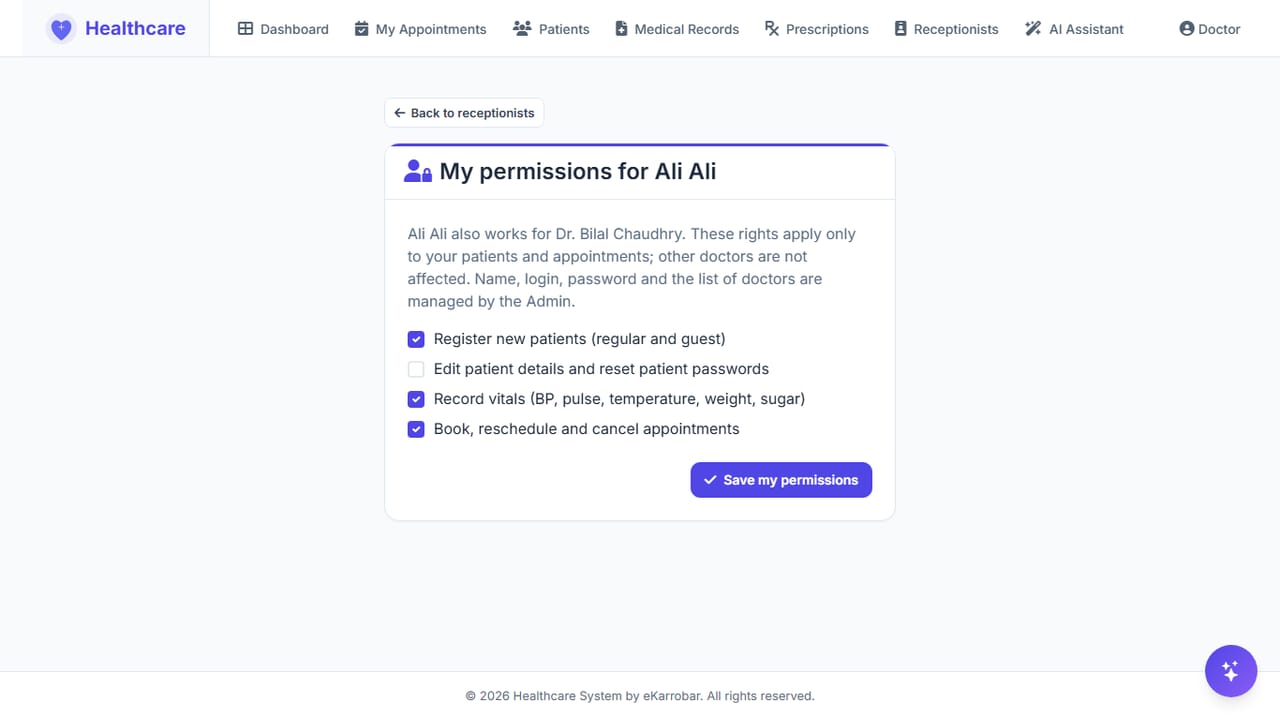
A receptionist the Admin also assigned to other doctors is shown with Shared with Dr. ... under the name, and the Permissions column shows Your permissions. You cannot edit, set the password of or remove a shared receptionist (ask the Admin). You can still:
- Click Edit my permissions, tick or untick what the receptionist may do for your patients and appointments, and click Save my permissions. This changes only your permissions; the other doctors' permissions stay as they are. You can reduce or increase them at any time.
- Click Remove from my list and confirm, to stop the receptionist working for you. They keep working for the other doctors and no longer see your patients.
Your receptionists see only your patients and appointments (a shared receptionist also sees those of the other doctors they work for, with the permissions each of those doctors set). They never see medical records, diagnoses (except on a sheet you allowed them to print) or test result files.
4.13 Use the Doctor assistant
Ask about your own work, for example "Show today's appointments", "Mere patients ki list dikhao" or "Which of my tests are awaiting results?". The Doctor assistant reads your own patients, visits, prescriptions, tests and vitals, and cannot change anything.
5. Receptionist Guide
| This role can | This role cannot |
|---|---|
| With the doctor's permission: register regular and guest patients; edit patient details and set patient passwords; book, reschedule and cancel appointments; record vitals; see the medicines of a prescription; print the prescription sheet; upload test result files for patients. Always: view the patients and appointments of the doctors you work for, and ask the Front Desk assistant about the day. | See diagnoses (apart from the printed sheet, if allowed), medical records or test result files; delete anything; manage staff; see the patients of doctors you do not work for (unless clinic-wide). |
Menu: Front Desk · Patients · Appointments · Calendar · Prescriptions (if allowed) · Test Results (if allowed) · AI Assistant
If a button is missing or a page shows Access Denied, the doctor concerned has not given you that permission. If you work for several doctors, the permissions can differ by doctor: for example you can book with Dr. A but not with Dr. B. The Front Desk shows "Your permissions differ by doctor" when this applies. Ask that doctor or the Admin to change it.
5.1 Start the day at the Front Desk
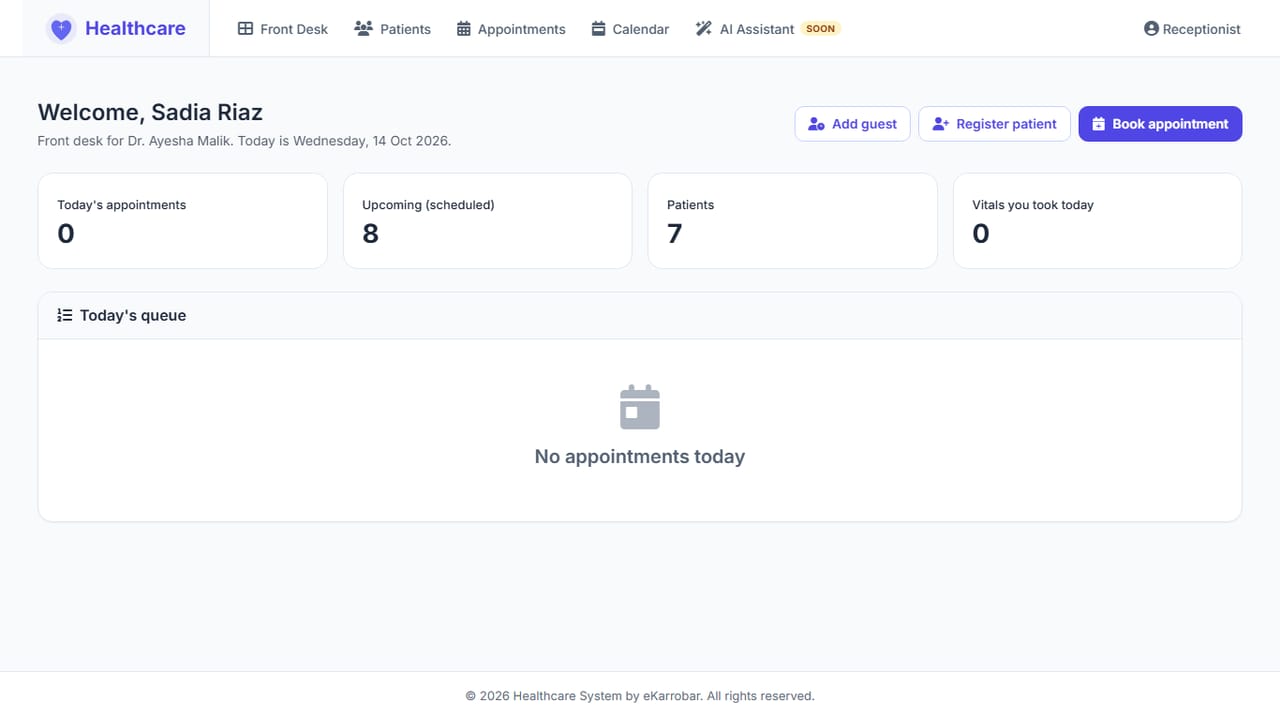
- Click Front Desk. The top line shows who you work for and today's date, for example "Front desk for Dr. A, Dr. B". If you work for several doctors, you see the patients and appointments of all of them.
- The cards show Today's appointments, Upcoming (scheduled), Patients and Vitals you took today.
- Today's queue lists each appointment with time, patient, doctor (when you work for several doctors), reason, status and vitals (Not taken, or the recorded BP). On a day without appointments it says "No appointments today".
- Use the buttons at the top for Add guest, Register patient and Book appointment. Use Vitals on a row to record that patient's vitals.
5.2 Register a regular patient
Use this for patients who will return and should have their own login.
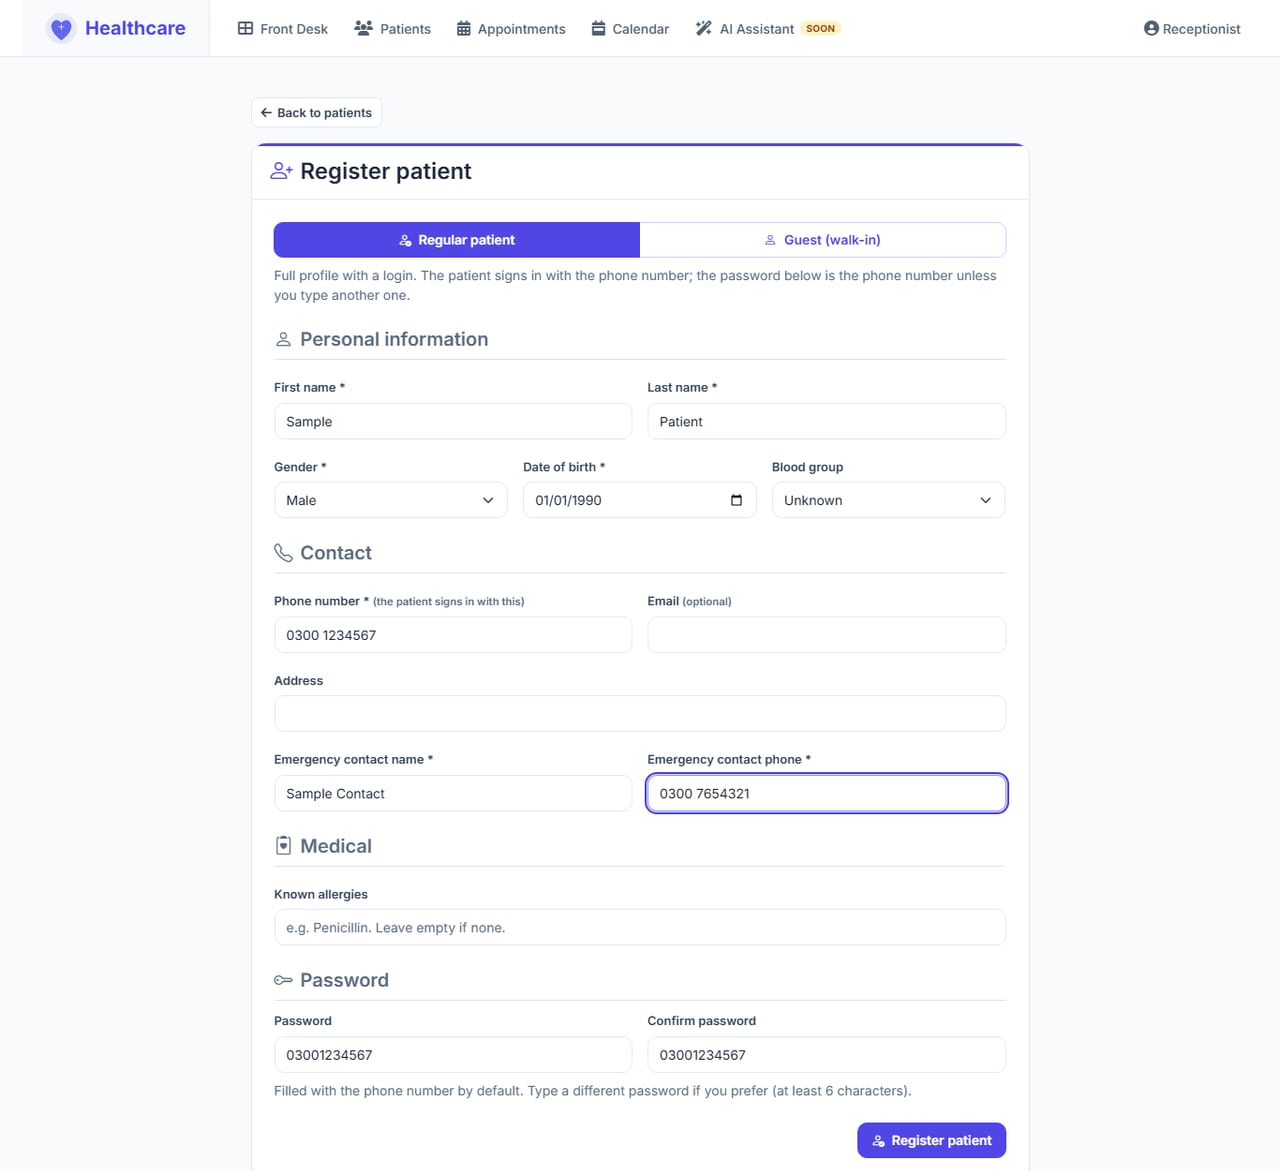
- Click Patients → Add Patient, or Register patient on the Front Desk.
- Keep Regular patient selected.
- Enter First name, Last name, Gender, Date of birth and Phone number. The phone number becomes the patient's login.
- Optional: Email, Address, Blood group and Known allergies.
- Enter Emergency contact name and Emergency contact phone (required). If you work for several doctors, also select Registered for doctor (required; the same applies to guests).
- Check Password and Confirm password. They fill in with the phone number as you type it. To use another password, type it in both boxes (at least 6 characters).
- Click Register patient. The patient page opens with a message that repeats the sign-in details. Tell the patient: they sign in with their phone number, and the password is the phone number (or the password you typed).
If the phone number is already used to sign in to another account, a regular patient cannot be registered with it. Use a different number, or register the patient as a guest (5.3).
5.3 Register a walk-in guest
Use this for one-time visitors, or when there is no time for full details. A guest also gets a login: the phone number is the username and, by default, the password.
- Click Patients → Add guest, or Add guest on the Front Desk.
- Enter First name, Last name, Gender, Phone number, and the age (years) or date of birth.
- Password and Confirm password fill in with the phone number. Change them only if you want another password.
- Click Register patient. The patient page opens with the badge Guest and a message with the sign-in details.
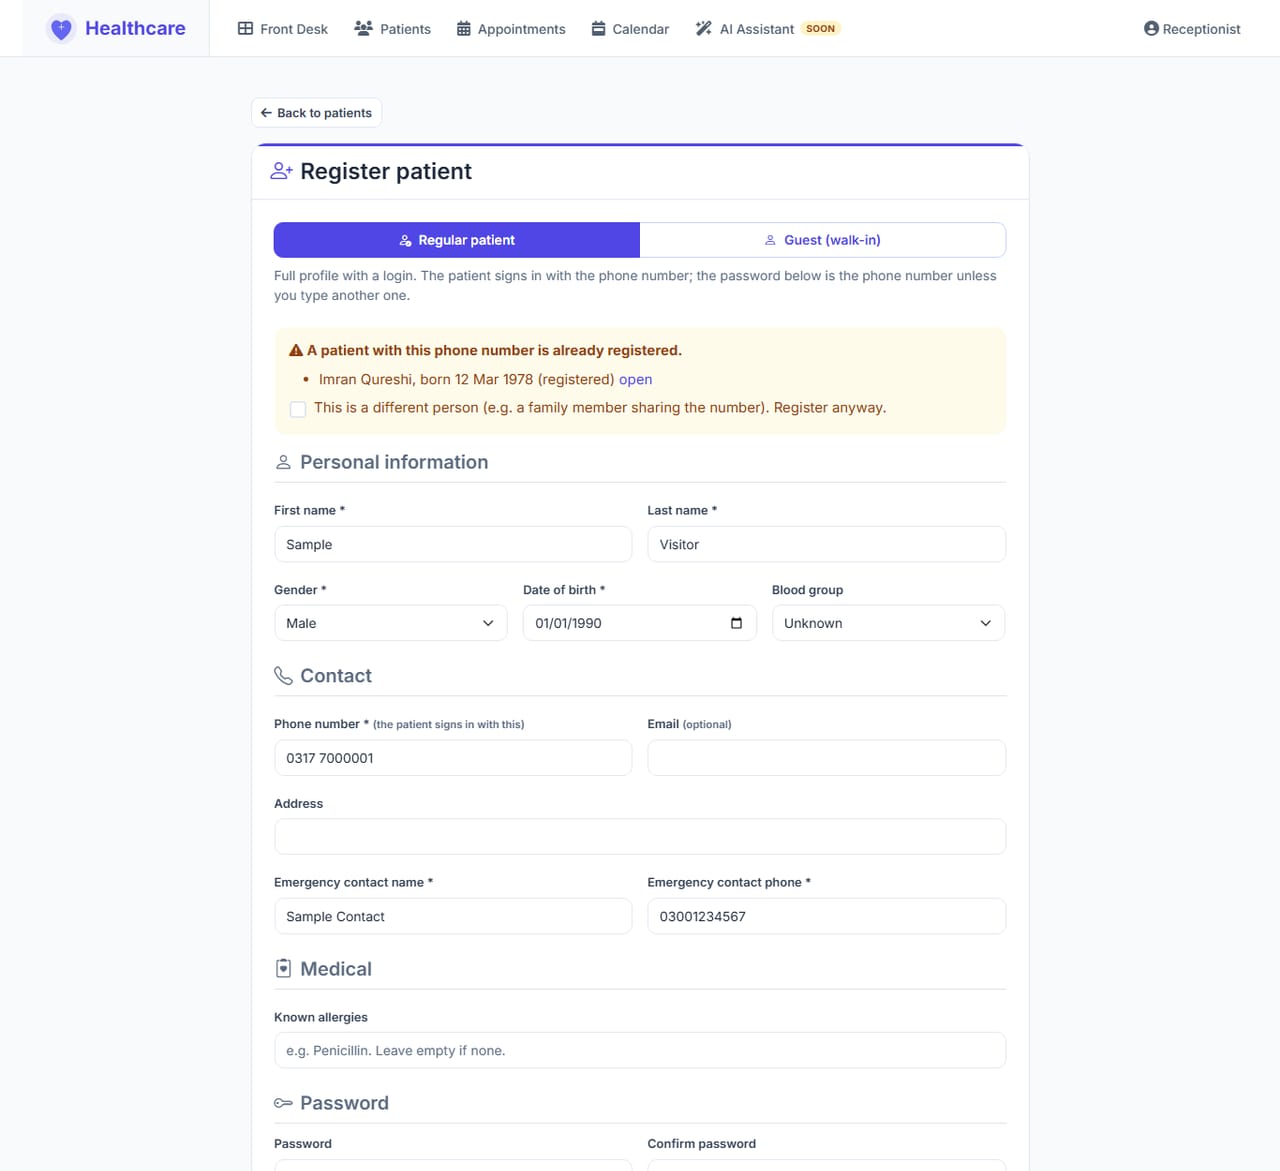
If the phone number is already registered, a yellow box lists the patients registered with that number:
- Same person: do not register again. Find the patient on Patients instead.
- Different person (for example a family member sharing the phone): tick This is a different person… Register anyway and click Register patient again.
One phone number can sign in to only one account. If the number already signs in to another patient, the guest is registered without a login and the badge shows Guest (no login).
5.4 Book an appointment
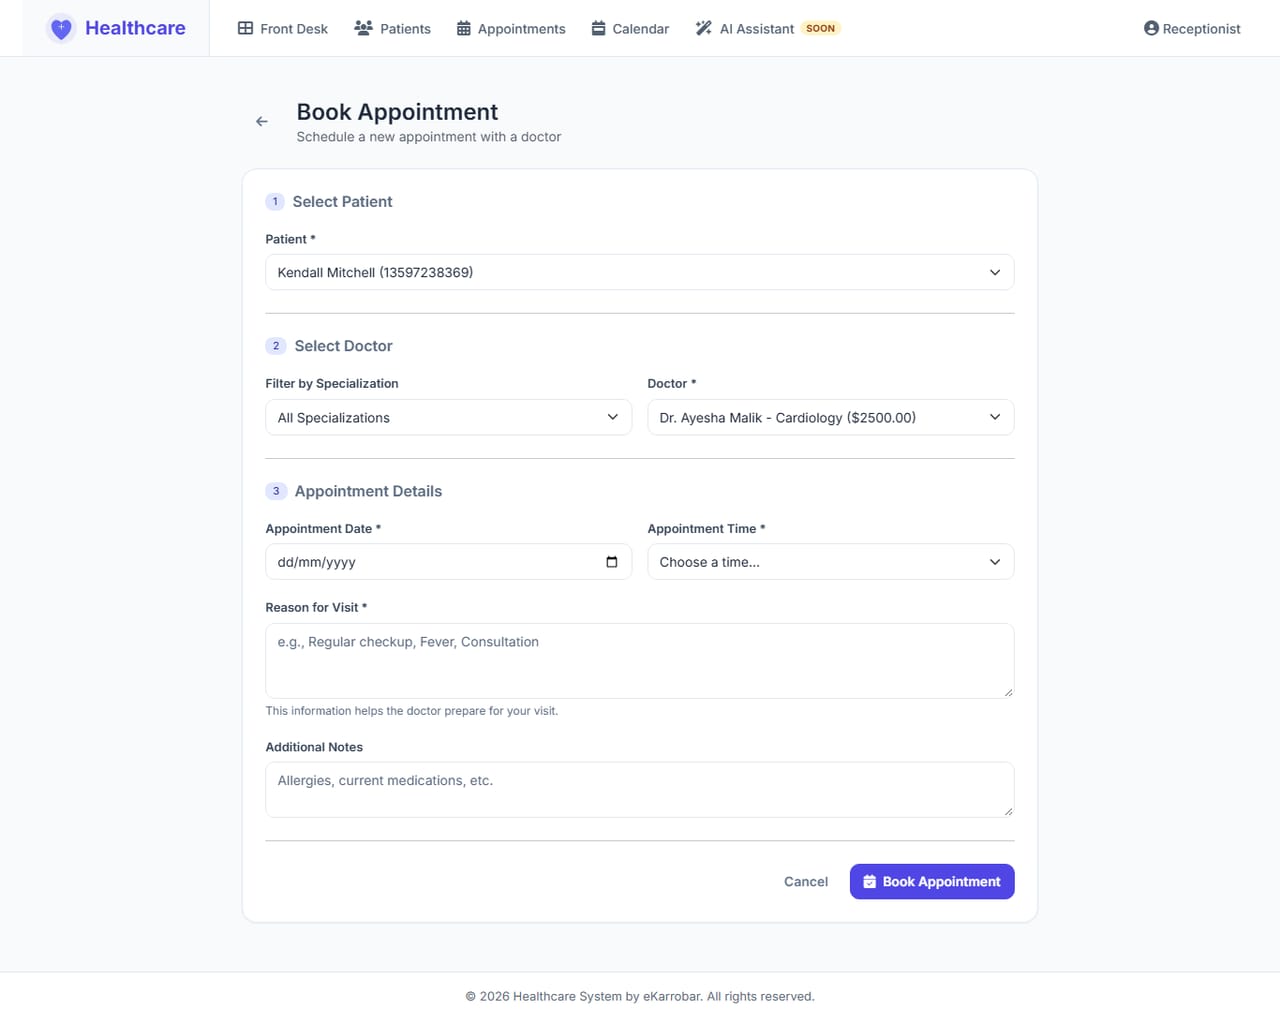
- Open the patient and click Book Appointment, or click Appointments → New Appointment and choose the Patient.
- If you work for one doctor, the Doctor is already set to that doctor. If you work for several doctors, or for the whole clinic, select the doctor.
- Choose the Appointment Date and Appointment Time (slots from 09:00 AM to 11:30 AM and from 02:00 PM to 05:00 PM).
- Enter the Reason for Visit, for example "Fever for 3 days".
- Submit the form. Appointments for today appear in the Front Desk queue.
5.5 Reschedule or cancel an appointment
- Click Appointments, or use the Front Desk queue, and click the eye icon on the appointment.
- Click Edit / Reschedule to change the date, time, reason or notes, then Save Changes.
- Click Cancel appointment to cancel. The appointment stays on record with the status Cancelled. If the patient did not come to a Past due appointment (shown in amber), click Mark as no show and confirm; you need the right to manage appointments for that doctor. A No show appointment can be rescheduled with Edit / Reschedule (new future date), which sets it back to Scheduled.
The Calendar page shows the month for the doctors you work for. Click an entry to open the appointment; on a phone the month is also listed below the grid.
Receptionists cannot delete appointments. Ask the Admin if one was created by mistake.
5.6 Record vitals
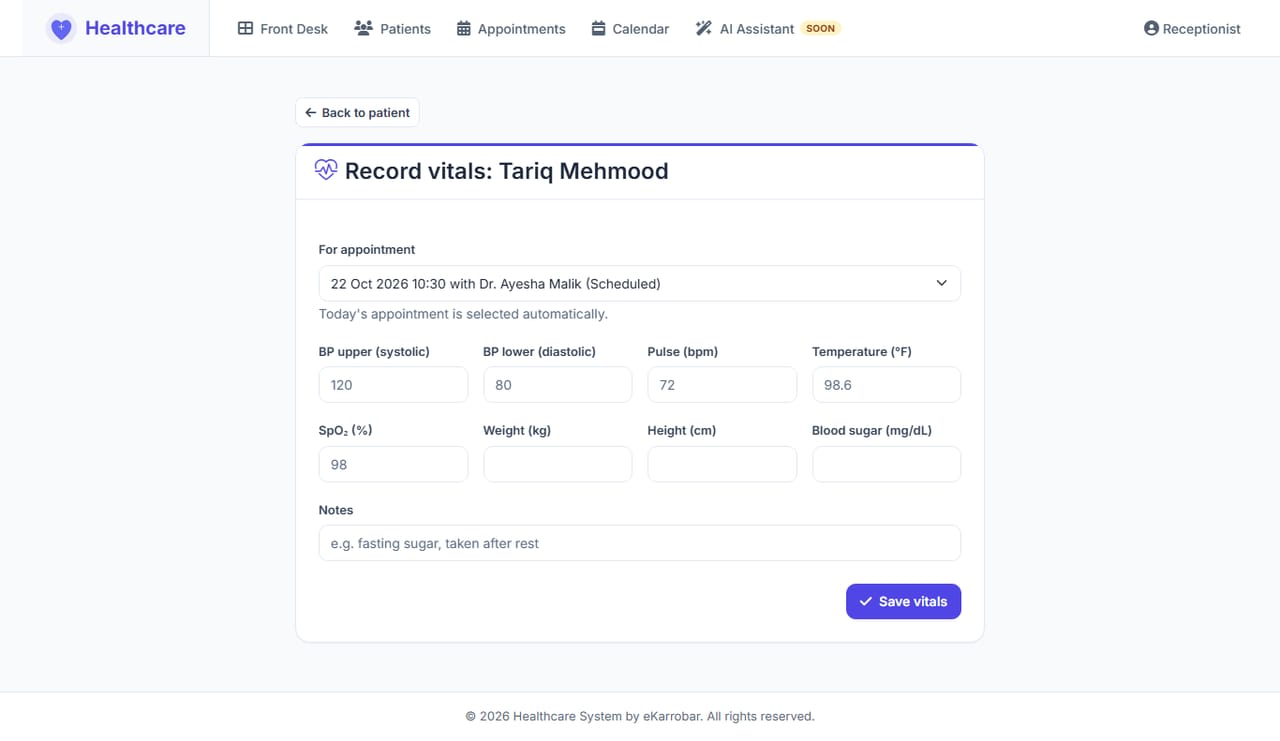
- On the Front Desk, click Vitals on the patient's row. You can also use Record vitals on the appointment or patient page.
- For appointment is set to today's appointment automatically; choose another one from the list if needed.
- Enter the readings you measured. At least one reading is required, and blood pressure needs both values: BP upper (systolic) and BP lower (diastolic), Pulse (bpm), Temperature (°F), SpO₂ (%), Weight (kg), Height (cm), Blood sugar (mg/dL), and Notes (for example "fasting sugar").
- Click Save vitals. The queue shows the BP, and the doctor sees the readings on the appointment.
5.7 Find a patient or update details
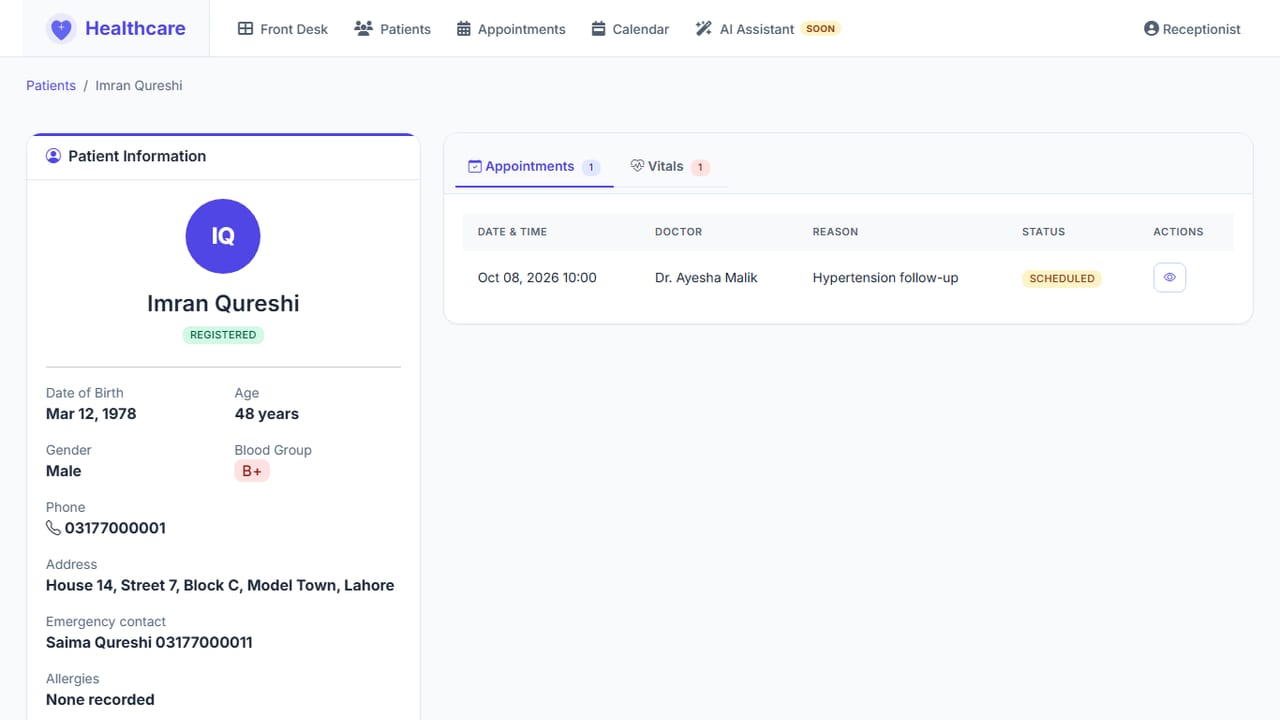
- Click Patients, type the name in the search box, and click the eye icon.
- The page shows the profile, Appointments and Vitals. Clinical tabs are not shown to receptionists.
- With permission, click Edit details to change information, then Save changes.
- With permission, click Set patient password for a patient who forgot the password, type the new password twice (or Use phone number as password), and click Save password.
5.8 Convert a guest to a regular patient
- Open the guest patient and click Convert to regular patient.
- Correct the Date of birth (guests often give only an age), and enter Emergency contact name and Emergency contact phone. Optional: Email and Address.
- Click Convert to regular patient. Earlier visits stay on the same patient record.
The patient keeps the same login and password. A guest registered without a login (badge Guest (no login)) also gets one here: Password and Confirm password fill in with the phone number, as on the registration form.
5.9 The Front Desk assistant
Open AI Assistant in the menu and ask about today's queue, find patients and see who still needs vitals. It only reads data and never shows clinical details. If the assistant is switched off for a while, the menu shows a Soon mark and a short note instead; use Patients, Appointments and Calendar until it is back.
5.10 See and print prescriptions
This needs the doctor's permission View prescriptions (medicines only, no diagnosis) or Print prescriptions (the full sheet; it includes the diagnosis). Without either, there is no Prescriptions entry in the menu (in the app: the More tab) and the page shows Access Denied.
- Click Prescriptions.
- The list has one row per visit: the Date, the Patient, the Doctor, every medicine with its dosage, frequency, duration and instructions, and the Rx no. Use the search box to find a patient or medicine.
- If the doctor allowed printing, each visit has a Print button. It opens the full prescription sheet, the same one the doctor prints. The sheet shows the diagnosis, so hand it only to the patient it is for. In the app the sheet opens in the PDF-style viewer with Share and Print.
The list shows only the medicines. You never see the diagnosis, notes or tests on this page, you cannot add or change a prescription, and the list only contains patients of the doctors you work for who allowed it. If you work for several doctors, Print appears only on the visits of doctors who allowed printing.
5.11 Upload a test result for a patient
This needs the doctor's permission Upload test results for patients. Without it there is no Test Results entry in the menu (in the app: the More tab).
- Click Test Results. The page Tests waiting for a result lists each test that has no result yet: Patient, Test, Ordered date and Doctor.
- Click Upload result on the row. The page shows the test and the patient.
- Click Choose File and pick the patient's result (PDF, JPG or PNG, up to 5 MB). A Draft - not uploaded yet preview appears. Check that it is the right file. Use Choose a different file or Remove to change it.
- Click Confirm & Upload. The list opens again with "Test result uploaded for …", and the test is gone from the list.
After the upload you cannot open, download, replace or delete the file, and you cannot see the test any more. Only the patient, the doctor who ordered the test and the Admin can open it. If a wrong file was uploaded, ask the patient to delete it and upload the right one, or ask the doctor.
6. Patient Guide
| This role can | This role cannot |
|---|---|
| Book and cancel own appointments; view own medical records and prescriptions; print prescriptions; upload lab test results; update own profile and password. | See other patients; change medical records or prescriptions. |
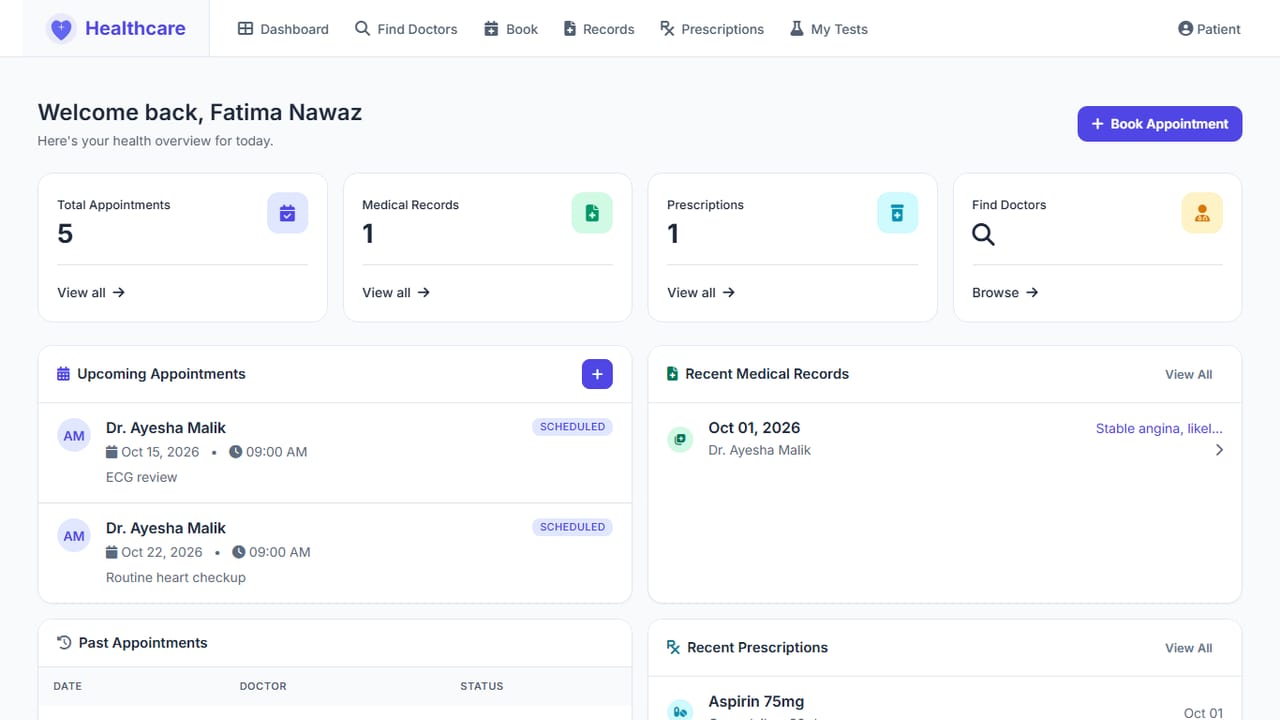
Menu: Dashboard · Find Doctors · Book · Records · Prescriptions · My Tests
6.1 Create an account
- On the home page, click Register.
- Enter your Email Address, a Password (twice), First Name, Last Name, Date of Birth and Gender, and optionally your Phone Number.
- Click Create Account, then sign in with your email and password.
If the clinic registered you, you already have an account. Sign in with your phone number; the password is also your phone number unless the clinic gave you another one (2.2).
6.2 Book an appointment
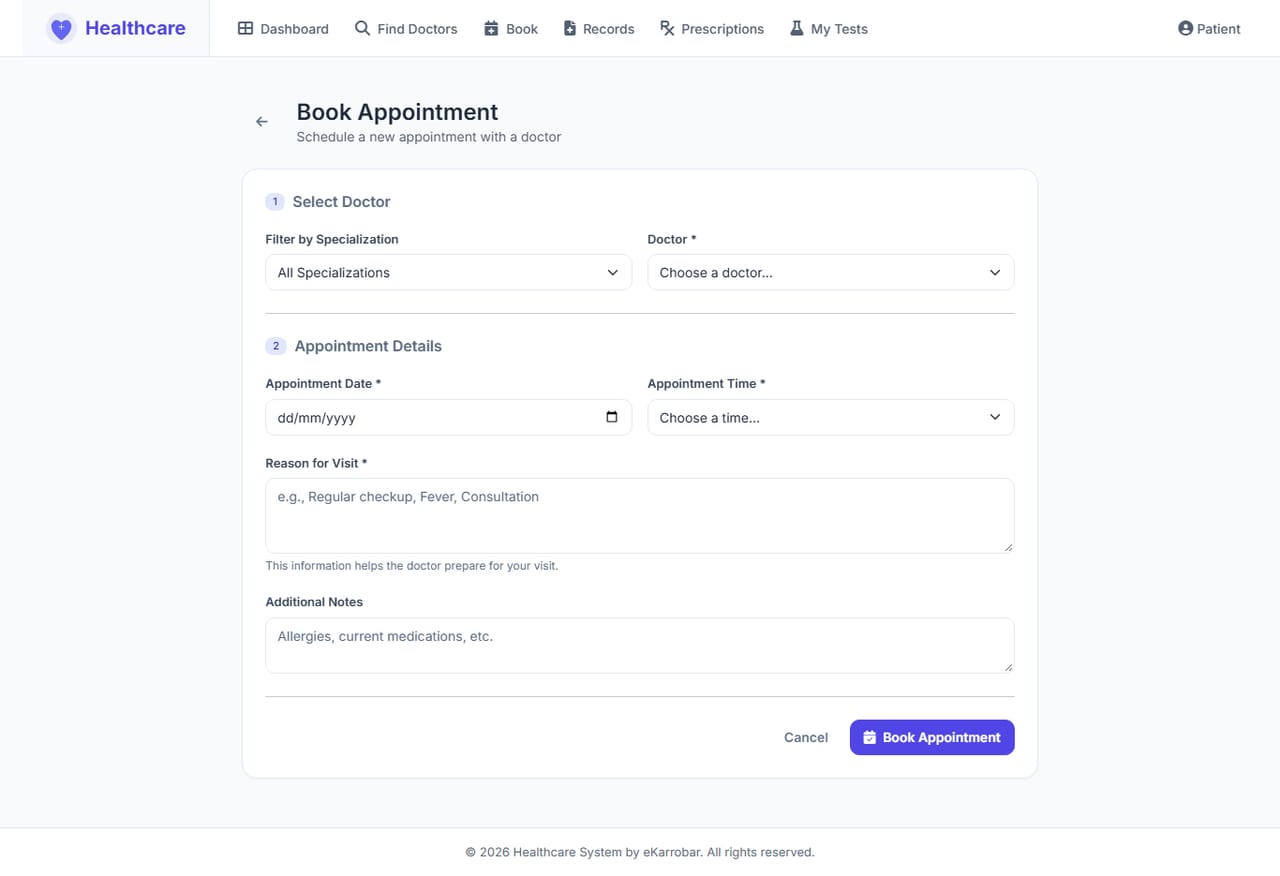
- Click Book, or Find Doctors and then Book Appointment on a doctor.
- Choose the Doctor, Appointment Date and Appointment Time, and enter the Reason for Visit.
- Submit the form. The appointment appears on your dashboard.
6.3 Cancel an appointment
On your Dashboard or My Appointments, find the appointment, click Cancel and confirm.
6.4 View records and prescriptions
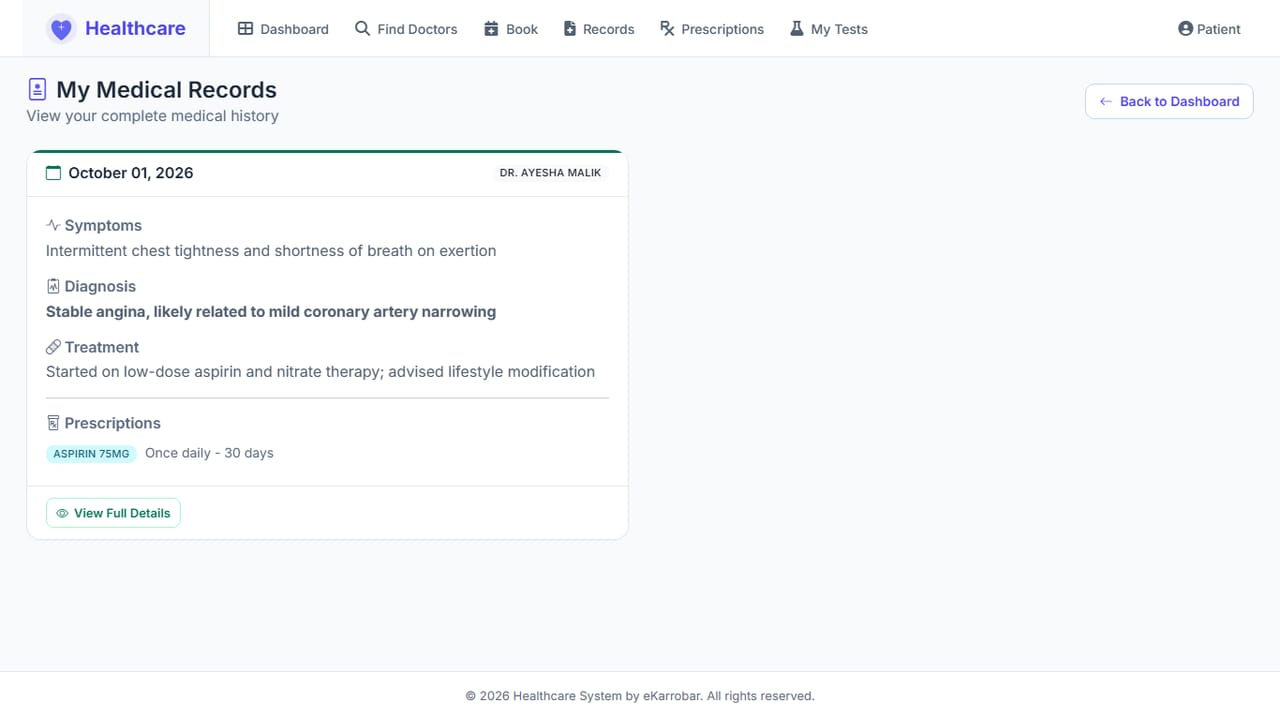
- Records: each visit with diagnosis and treatment. Click View Full Details to open one.
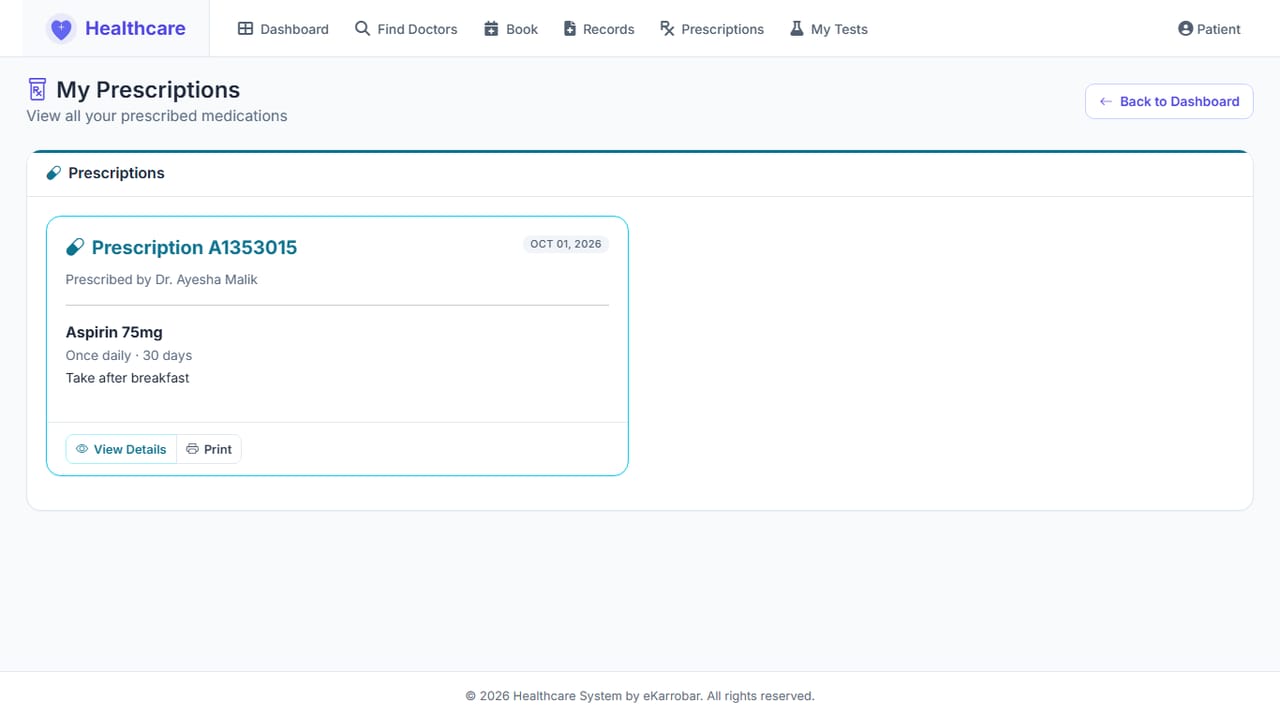
- Prescriptions: one card for each visit, showing the prescription number (the same number is printed on the sheet), the date, the doctor and every medicine of that visit with its dosage, frequency, duration and instructions. View Details opens the visit's record and Print opens the prescription sheet.
6.5 Upload, view, replace or delete a lab test result
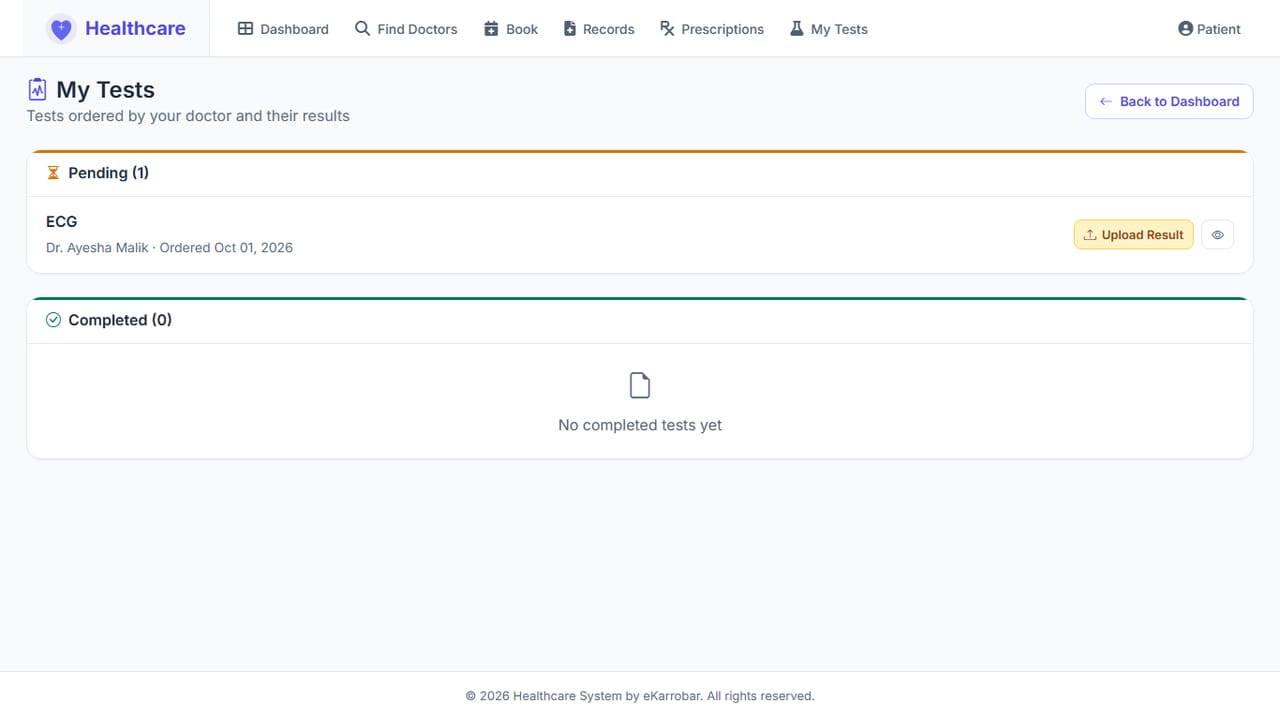
- Click My Tests. Tests ordered by your doctor are listed under Pending with an Upload Result button.
- Click Upload Result and choose the report file: PDF, JPG or PNG, up to 5 MB.
- Click Upload Result again on the upload page. The test moves to Completed and your doctor can see the report.
View your result. Under Completed, click the test. The page shows a preview of your file (a PDF in the page, a picture right in the page). Open full size shows it in its own window and Download Result saves it to your device. In the mobile app a PDF shows as a file card: tap Open full size to read it.
Sent the wrong file? On the same page:
- Click Replace file, choose the correct file and click Replace Result. The old file is removed and the new one takes its place.
- Click Delete and confirm to remove the file. The test goes back to Pending with the status Ordered, and you can upload a new file whenever you are ready.
Your result can be opened by you, the doctor who ordered the test and the clinic Admin. Receptionists and other doctors cannot see it.
6.6 Update your profile and password
- On your Dashboard, click Edit Profile to change your name, phone, address or blood group, then Save Changes.
- My Profile (in the account menu under Patient at the top right) shows your full details and history.
- Change password is in the same account menu.
7. Mobile App
The clinic has an Android app. It shows the same system as the website, with a layout made for phones: tabs at the bottom, big buttons and lists you can scroll with your thumb. You sign in with the same login and see the same data.
7.1 Install the Android app
The app is a file ending in .apk (for example Healthcare-v5-live.apk). The clinic or the IT person gives it to you by link, WhatsApp, email or USB cable.
- Download the file on your phone and open it (from the notification, or from Files → Downloads).
- If Android says it blocked the install, tap Settings and switch on Install unknown apps (or Allow from this source) for the app you used to open the file, such as Chrome, Files or WhatsApp. Go back and tap Install.
- Tap Open. The Healthcare icon is now on your home screen.
- If the install fails with "App not installed" or says there is a conflict, uninstall the older Healthcare app first (long-press its icon, Uninstall) and install again. Nothing is lost: all data is kept on the clinic's server.
The app needs an internet connection. You only reinstall it when the clinic gives you a new .apk, which is rare. New pages, buttons and fixes arrive by themselves the next time you open the app or pull down to refresh.
An iPhone version is not available yet. On an iPhone, open the clinic's website in Safari.
7.2 Sign in once and stay signed in
- Open the app. It starts on the Sign in screen, never on the website's front page.
- Enter your email or phone number and your password, as in 2.1, and tap Sign In. New patients tap Create one under the button to register.
- The app remembers you for 30 days, and every time you open it the 30 days start again. You do not need to sign in each time.
- To end this, open More and tap Log out. You must also sign in again after your password is changed (also when staff set a new one) or when the clinic switches your account off.
7.3 Tabs, the "+" button and the More sheet
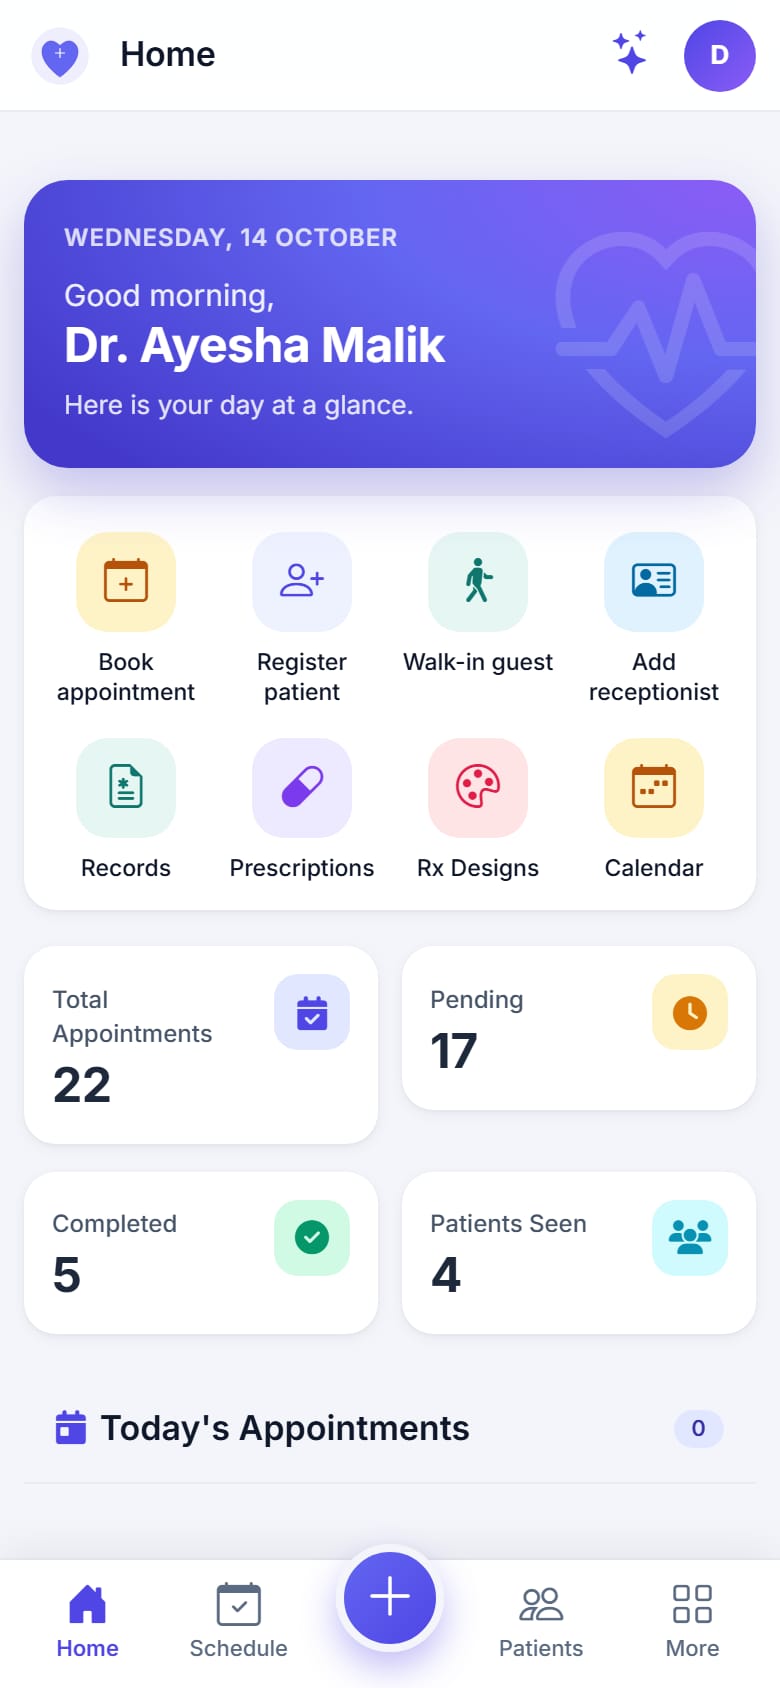
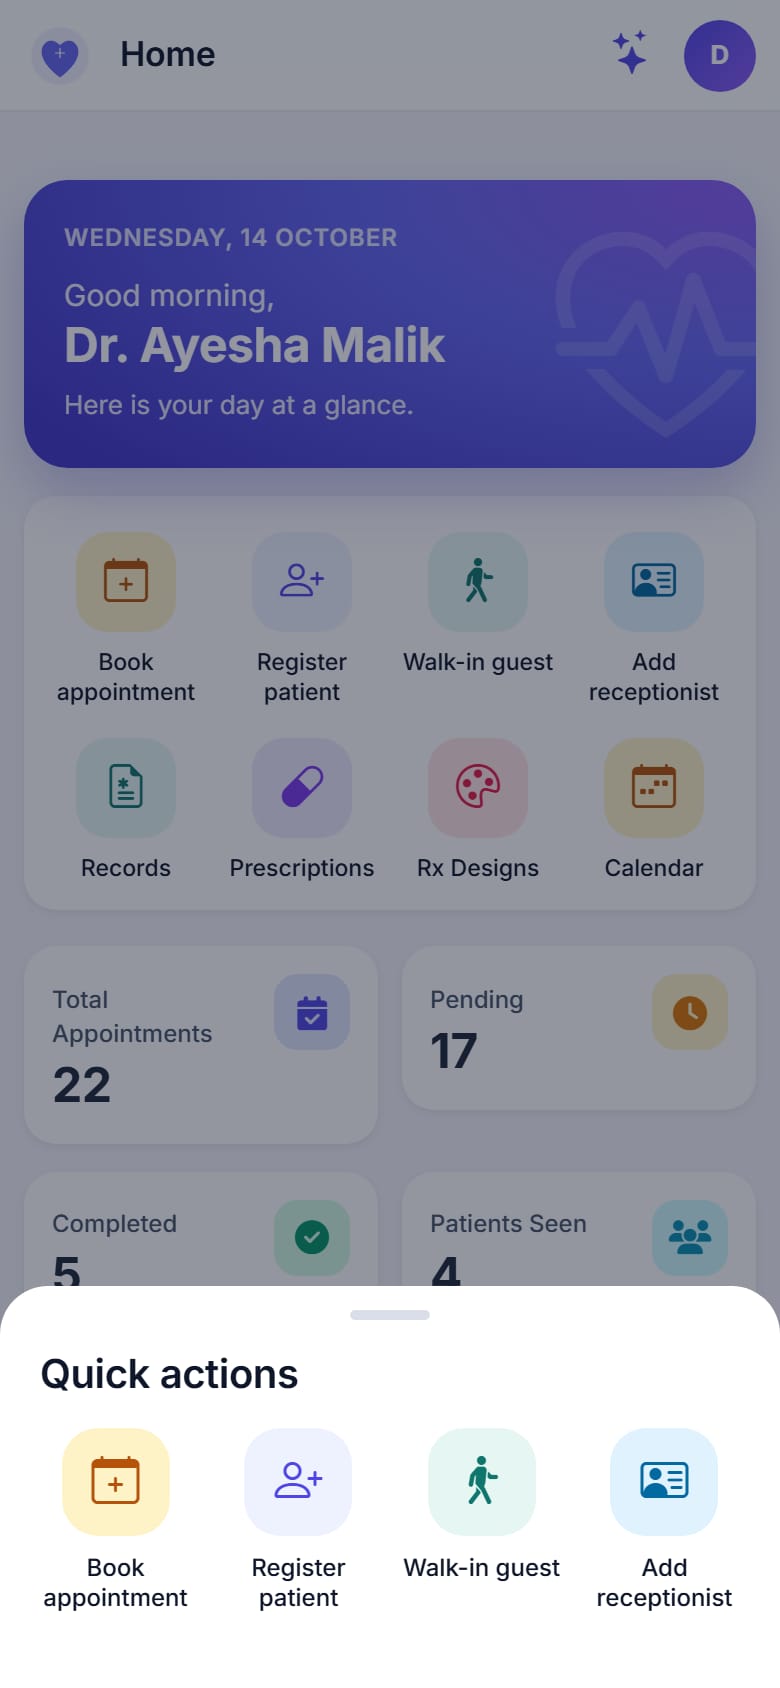
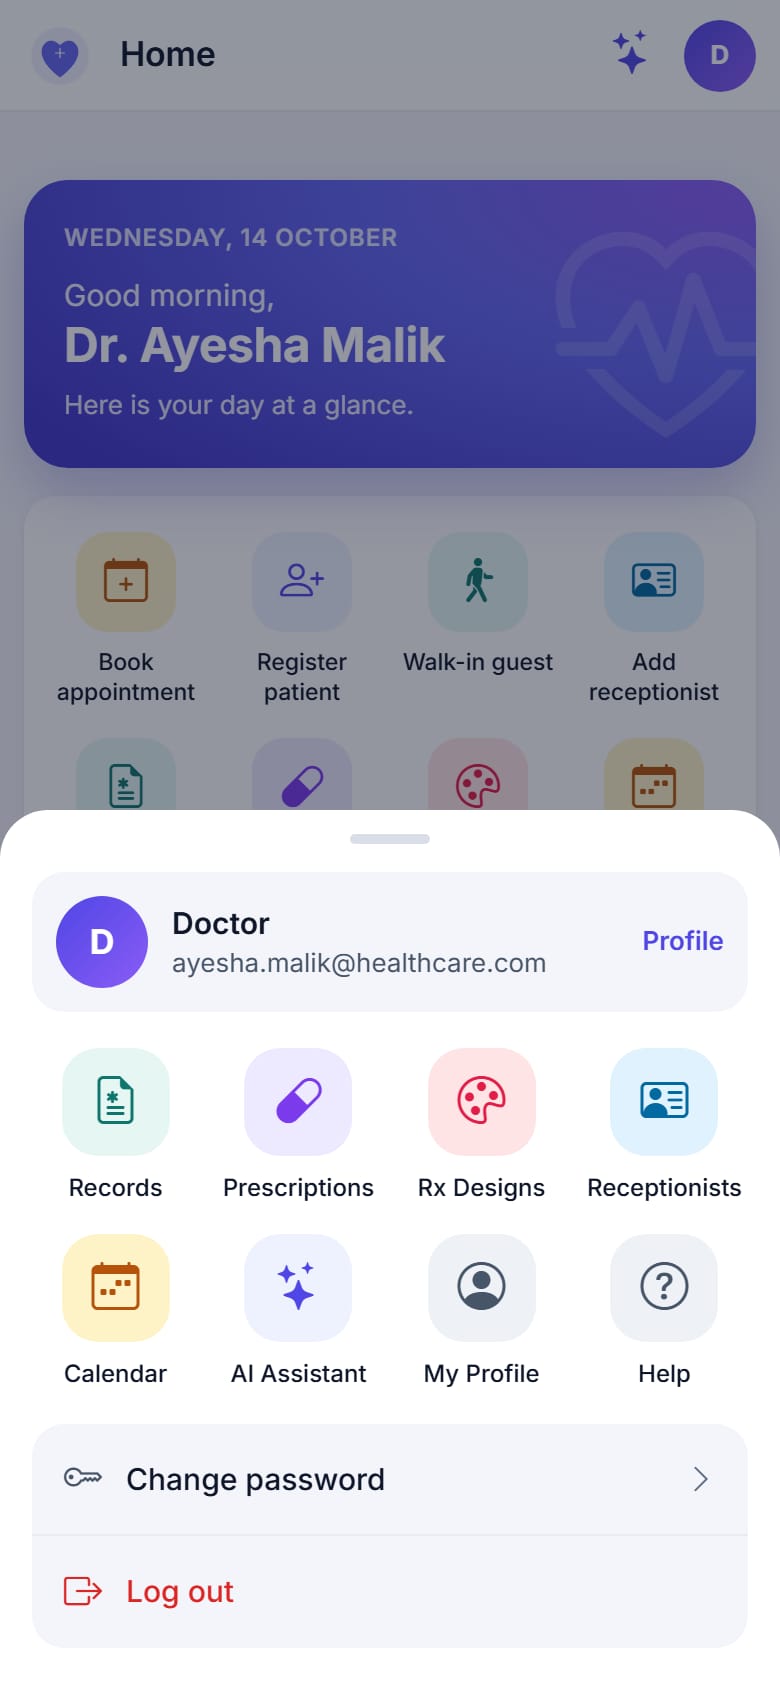
The bottom bar has four tabs and a round + button in the middle. The + button opens Quick actions for the things you do most. The More tab opens a sheet with your name and login, the remaining pages, Help (this guide), Change password and Log out. Tap the round letter at the top right to open the same sheet from any screen.
7.4 Admin: tabs and menus
| Where | What you find |
|---|---|
| Tabs | Home, Patients, Appointments, More |
| + Quick actions | Register patient, Walk-in guest, Book appointment, Add doctor, Add receptionist |
| More | Doctors, Receptionists, Records, Prescriptions, Calendar, AI Assistant, Clinic Profile, Audit log, Help |
7.5 Doctor: tabs and menus
| Where | What you find |
|---|---|
| Tabs | Home, Schedule (My Appointments), Patients, More |
| + Quick actions | Book appointment, Register patient, Walk-in guest, Add receptionist |
| More | Records, Prescriptions, Rx Designs, Receptionists, Calendar, AI Assistant, My Profile, Help |
7.6 Receptionist: tabs and menus
| Where | What you find |
|---|---|
| Tabs | Front Desk, Patients, Appointments, More |
| + Quick actions | Register patient, Walk-in guest and Book appointment, only the ones your doctor allowed. If you may do none of these, the button opens the patient search. |
| More | Calendar, Prescriptions (only if a doctor allowed you to view or print them), Test Results (only if a doctor allowed you to upload results), AI Assistant (marked Soon), Help |
7.7 Patient: tabs and menus
| Where | What you find |
|---|---|
| Tabs | Home, Visits (My Appointments), Records, More |
| + button | Opens Book appointment directly |
| More | Prescriptions, My Tests, Find Doctors, My Profile, Help |
7.8 Everyday use
- Back: use the arrow at the top left of a screen, or the phone's back button.
- Pull down to refresh: pull a page down from the top to reload it. If a form has text you have not saved, the app asks first.
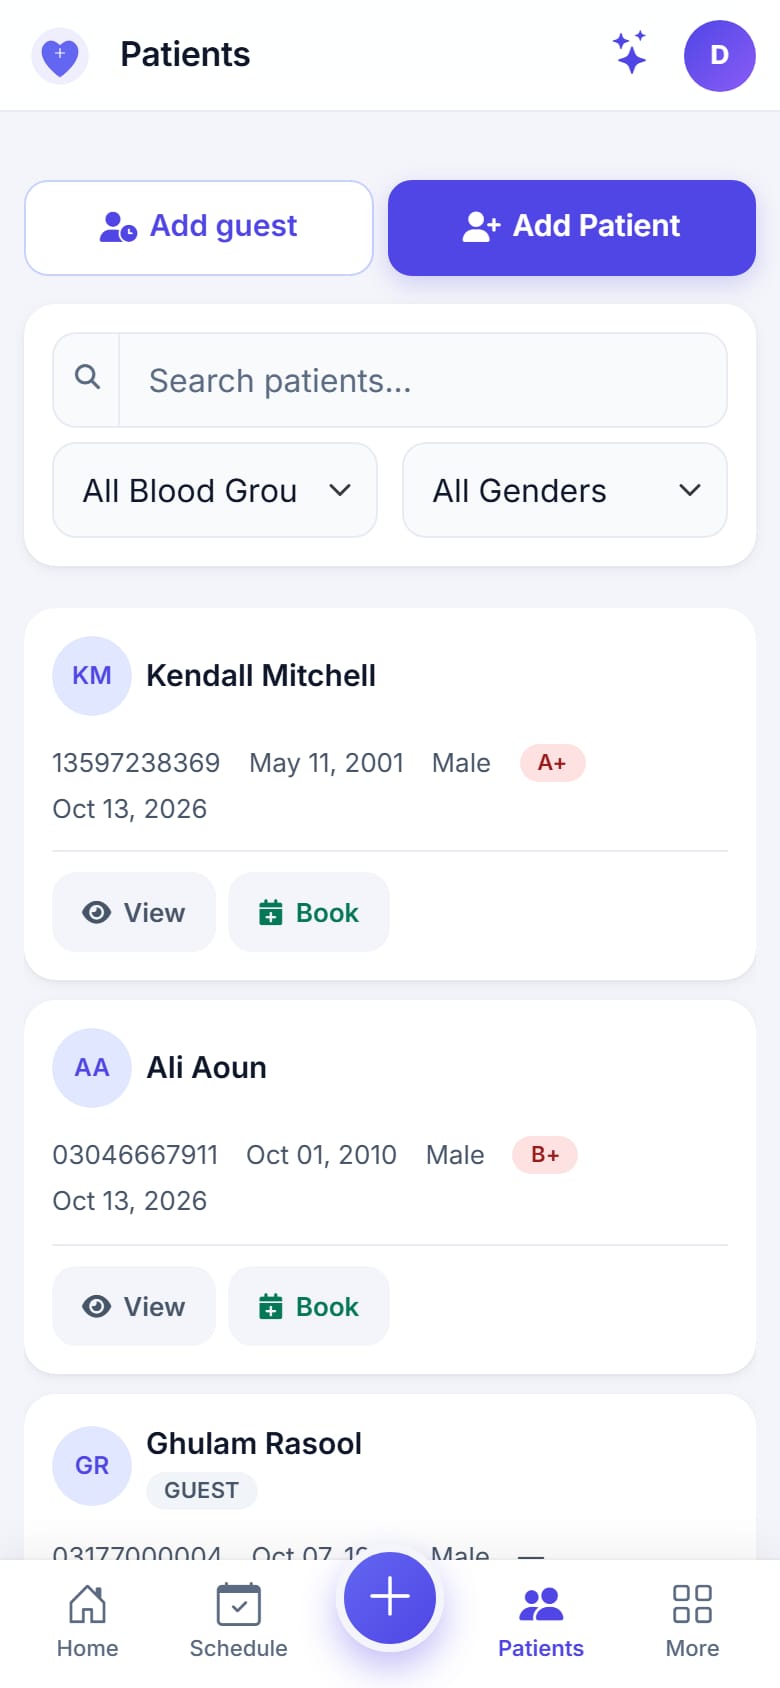
- Lists: tables become cards. Buttons such as View, Book, Print and Edit show their names next to the icons.
- AI assistant (Admin and Doctor): tap the sparkles button at the top of a screen. The assistant opens full screen and the back button closes it. For receptionists the button is marked Soon and opens a short note until the front desk assistant is released; after that it works like the Doctor one.
- Lab results: a PDF report shows as a file card (tap Open full size to read it); a picture is shown in the page. Download Result saves the report to your phone's Downloads folder.
- Dates and times are in Pakistan time.
7.9 Print or share a prescription
- Open the medical record or the prescription and tap Print (the printer icon).
- The prescription opens like a PDF page, fitted to your screen. Turn the phone sideways for a wider view.
- Tap Share to send it as a PDF (named
Prescription-<patient>-<date>.pdf) through WhatsApp, email, Files or any app on the share sheet. Tap Print to use the phone's print dialog or a printer. The arrow at the top left goes back.
7.10 Voice dictation on Quick Visit
Doctors can speak the visit details instead of typing them. Open an appointment, tap Quick Visit, then tap the round microphone button at the bottom right (4.3).
- The first time, Android asks to allow the microphone. Tap While using the app (or Allow). If you refused it, open the phone's Settings → Apps → Healthcare → Permissions → Microphone and allow it.
- Speak clearly. A small message at the bottom shows Recording with the time. Tap the button again to stop.
- The message changes to Processing your dictation. After a few seconds it says Visit details filled (or Could not use the recording with the reason) and disappears by itself. Check every field, especially medicine names, before you tap Save Visit.
7.11 When there is no internet
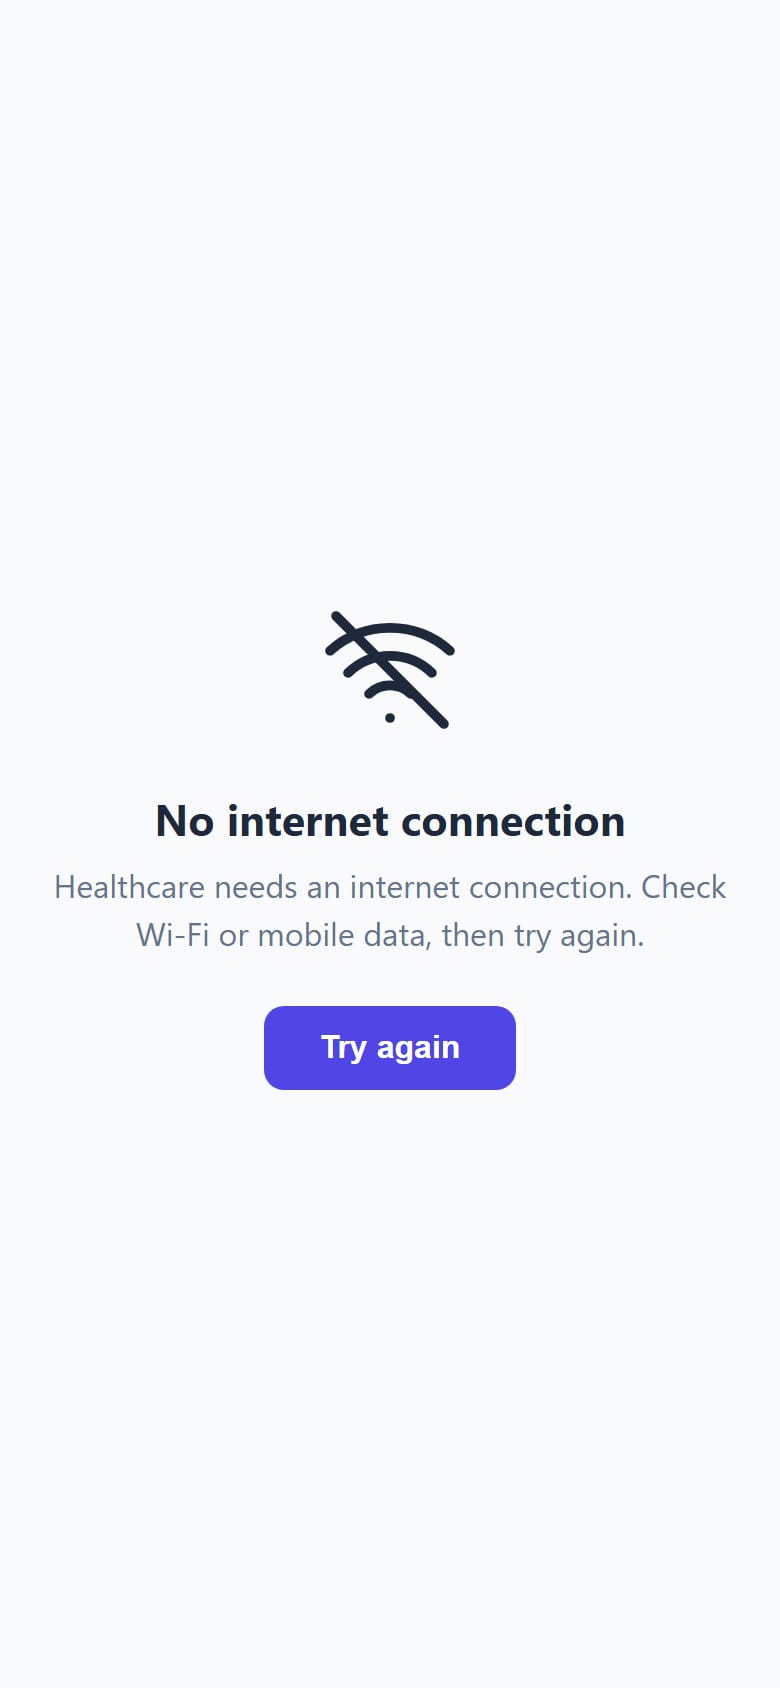
If the phone has no connection, the app shows No internet connection. Check Wi-Fi or mobile data and tap Try again. The app also reloads by itself when the connection returns.
7.12 What is different on a phone
- The prescription designer needs a larger screen: on a phone it shows "Use a larger screen to design prescriptions". Open the website on a computer or tablet to design a layout. Choosing a ready-made design still works on a phone.
- The menu is at the bottom, and wide tables become cards, so you do not see every column. Open the patient or record to see the details.
- The calendar shows the month as a grid with a list of the month's appointments below it.
- The website's top menu and footer are not shown in the app.